A sagging gate usually comes from loose hinges, a warped frame, or unstable mounting. Start by inspecting and tightening mounting screws and hinges, but tighten gradually to avoid stripping. Check posts for plumb and shake, then realign hinge plates to restore even gaps. If the frame or posts show sway, reinforce with shims or repair plates. Maintain weatherproof fasteners and replace worn hardware as needed. With a few precise tweaks, you’ll restore a solid, swinging gate—and there’s more to optimize beyond this.
Identify the Root Cause of Sagging: Hinges, Frame, or Mounting
Hinges, the frame, or the mounting are the usual culprits behind a sagging gate, and diagnosing which one is at fault starts with a quick, systematic check. You’ll begin by testing swing effort and alignment, noting any binding or looseness.
Inspect the gate structure for warped boards or cracked framing, and verify that hinges are tight and properly seated on both the gate and post. If the door drags or won’t close flush, focus on post stability: ensure the posts are plumb, solid, and securely set.
Measure gaps at the hinge side and top rail to confirm equal clearance. Document any deviations, then prioritize corrections that restore even weight distribution and balanced operation.
This precise assessment guides reliable repairs and invites you into a shared, capable repair mindset.
Gather the Right Tools and Hardware for Gate Repair
Before you start repairs, gather the exact tools and hardware you’ll rely on: a tape measure, level, square, and a contractor’s square for precise alignment; a screwdriver set and drill with bits; a hammer or mallet; a wrench or socket set for the hinges and mounting hardware; and replacement parts like Hinges, screws, lag bolts, shims, and wood glue as needed.
Choosing the right tools begins with accuracy and confidence, so pick dependable devices you trust.
Selecting hardware options means matching hinge type, screw length, and post material to your gate and frame. Verify you have weatherproof fasteners for exterior use and consider stainless or galvanized finishes to resist corrosion.
Keep spare shims and clamps handy to hold parts during installation, promoting clean alignment and a secure, lasting repair.
Belonging comes from prepared, precise work.
Tighten Loose Mounting Screws and Hinges
If you’ve noticed play in the gate or a sag that’s affecting the latch, start by tightening the mounting screws and hinges.
With patience, inspect each fastener: loosened screws can undercut the gate’s alignment, while loose hinges invite future misalignment. Tighten gradually, using a screwdriver in a steady, opposite-forces motion to avoid striping.
Check for plumb and level as you tighten, and test swing after each turn.
If you encounter stubborn hardware, consider replacing worn screws with corrosion-resistant, decorative hardware to maintain both function and curb appeal.
Weatherproofing tips matter here too: apply a lightweight sealant around screw heads and hinge plates to deter moisture.
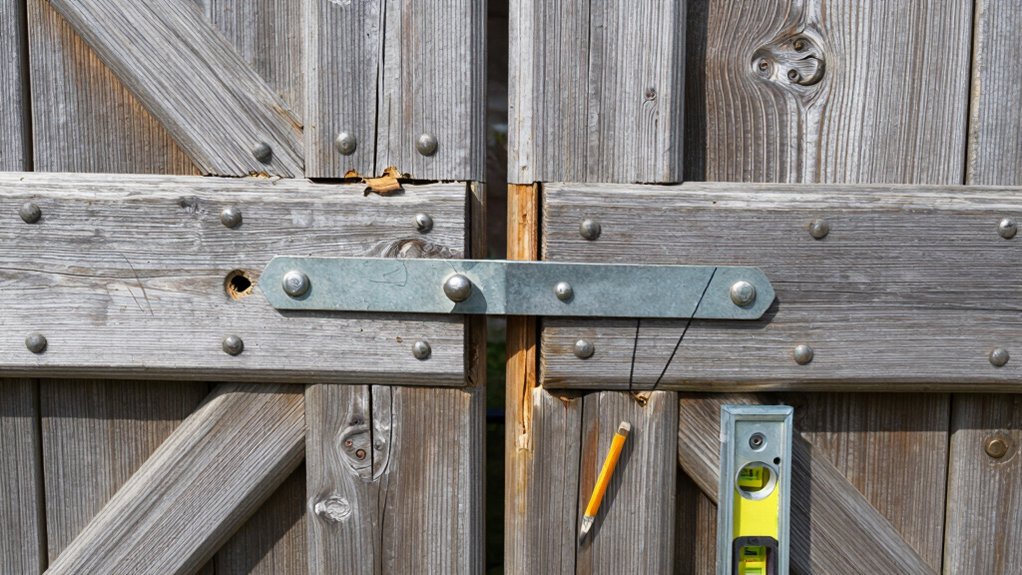
Realign the Gate for a Smooth, Even Swing
To start realigning, check how the hinges sit and adjust their alignment for a balanced swing.
Tighten the latch so the door closes firmly without binding, then test the arc and tweak as needed.
You’ll want precise, small tweaks to both hinge alignment and latch fit to achieve a smooth, even swing.
Adjust Hinge Alignment
Adjusting the hinge alignment starts with a precise check of how the gate sits in its frame; small twists can keep the swing uneven or cause binding. You’ll identify whether hinges are pitched, offset, or sagging, then plan corrective steps.
Start with a level, test swing, and note where resistance occurs. Tighten or loosen screws in small increments, recheck plumb, and confirm smooth motion without binding.
If hinges show wear, replace with matching decorative hardware to preserve style while improving function.
After alignment, inspect paint touch up on surrounding trim to prevent moisture intrusion. Ensure screws seat firmly in solid framing to avoid future drift.
Consistency matters; even gaps render a gate less secure and keep neighbors content.
- Check level and plumb before tightening
- Use correct screws and decorative hardware
- Finish with paint touch up to seal edges
Tighten Gate Latch
Tighten the gate latch and realign the gate for a smooth, even swing by checking the latch alignment with the strike plate. You’ll notice whether the latch catches cleanly or drags.
Begin by loosening the striker screws just enough to observe movement, then open and close slowly to gauge gaps. If the latch tip misses the plate, adjust the strike plate position in small increments, testing after each nudge.
For a firmer hold, tighten the latch mounting screws evenly, ensuring the latch sits square to the keeper. If misalignment persists, perform a gate latch adjustment by nudging the strike slightly toward the hinge side or away from it, maintaining symmetry.
This latch alignment correction restores reliable, quiet operation, and invites confident, repeated use.
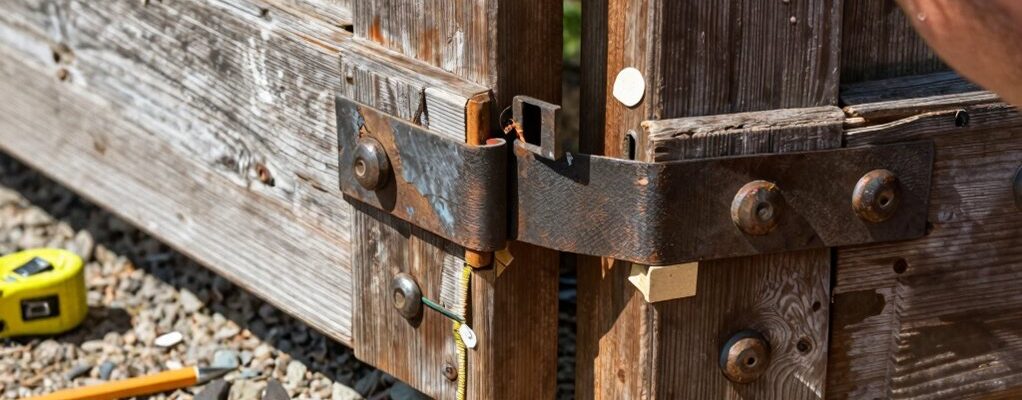
Fix Warped Frames and Misaligned Hinge Plates
Warped frames and misaligned hinge plates can throw a gate out of true, so start by confirming how much misalignment exists and where it shifts as the gate moves. You’ll want a precise read—lift, swing, settle—and note every hotspot.
Then plan targeted fixes that respect your gate’s frame and material, whether wooden gates or metal gate repair. Approach with care, not force, and recheck after each adjustment.
- Verify hinge screw tension and plate seating to prevent future drift
- Straighten frames with careful tapping or shims, staying within wood or steel tolerances
- Re-align hinge plates to restore square travel and consistent gaps
With steady hands and clear measurements, you’ll restore alignment while preserving community trust and long-term durability.
Stabilize With Hinge Shims and Repair Plates
If the gate still drifts after preliminary checks, stabilize it by slipping hinge shims to fill gaps and re-seat the hinge plates for consistent travel.
With steady hands, align the hinges so each door leaf lands squarely in its frame, then insert shims between the hinge mortise and the hinge wings until no play remains.
Tighten screws incrementally, checking for lift or binding as you go.
If a plate cracks or distorts, replace it with a compatible repair plate to restore true hanging and uniform closing.
This step preserves Gate aesthetics by avoiding loose hardware and wobble.
While you work, consider decorative hardware options that complement your gate’s style, ensuring the repair supports a cohesive, welcoming look for your property.
Your gate will feel solid, and you’ll belong.
Prevent Sagging With Ongoing Maintenance
Set up a regular tightening schedule so you catch loose hardware before it causes sag.
Periodically inspect the hinges and posts for wear, corrosion, or movement, and address issues promptly.
With consistent checks, you maintain alignment and prevent future sagging.
Regular Tightening Schedule
Establishing a regular tightening schedule keeps a gate from sagging over time. You’ll protect alignment, reduce wear, and preserve that welcoming feel your entry promises.
By checking hardware and fasteners on a routine basis, you stay ahead of shifts caused by weather, use, and age. Keep a simple cadence: quarterly checks, then tighten or adjust as needed.
Consistency builds confidence and prevents larger fixes later. When you address loose screws, hinges, or latches now, you maintain smooth operation and gate painting longevity, while decorative hardware remains secure and stylish.
Your effort reinforces a sense of belonging for everyone who uses the gate, showing care for your home and neighborhood.
- Schedule concise 15-minute checks every three months
- Note looseness and target fasteners first
- Pair maintenance with related projects like decorative hardware updates
Inspect Hinges and Posts
Inspect hinges and posts regularly to prevent sagging before it starts. You’ll stay ahead by checking each hinge pin, screw, and bracket for looseness, corrosion, or wear, and you’ll replace worn components before they loosen further.
As you inspect the posts, confirm they’re plumb and solid in the ground, and look for any subtle leaning that could amplify over time.
Tighten fasteners with purpose, but avoid overtightening that can strip threads or crack wood.
Consider latch mechanisms to ensure smooth operation and reliable closure, addressing any sticking or misalignment early.
If a post shows signs of movement, perform post reinforcement, using anchors or brackets designed for your gate’s weight.
Maintain a simple, durable setup so your gate remains level and confident, year after year.
When to Replace Hinges or Call a Professional
If the hinges are bent, sagging, or squeaking despite tightening the screws, it’s time to assess whether you can fix them or if you should call a professional.
You’ll decide by checking hardware condition, alignment, and load. If the frame is warped or posts shifted, replacing hinges or consulting a pro is prudent.
For minor issues, you may still save time with decorative hinges and targeted hinge lubrication to restore function and appearance.
A pro helps when measurements, material compatibility, or structural integrity are in question.
Trust your judgment, but prioritize safety and long-term reliability for your gate’s welcoming feel.
- Evaluate condition: bending, wear, and alignment before acting
- When in doubt, opt for professional assessment
- Consider decorative hinges for aesthetics and function
Frequently Asked Questions
How Long Does It Take to Fix a Sagging Gate?
Most homeowners save up to 50% by DIY, so you’ll fix it faster than you think. You’ll apply gate reinforcement, lubricate hinges, and tighten screws, then test alignment until it swings smoothly and feels truly secure.
Can a Sagging Gate Cause Extra Door Alignment Issues?
Yes, a gate sagging can trigger extra door alignment issues. When you address Gate sagging with hinge replacement, you stabilize frames, reduce binding, and restore smooth operation, helping you feel confident, connected, and properly supported in your home.
Will Weather Affect the Gate Repair Longevity?
Weather will affect the repair longevity. You’ll notice seasonal moisture and temperature shifts test material durability, so you plan for protective coatings and proper drainage to keep hinges and posts tight, ensuring lasting security and shared sense of reliability.
Should I Replace All Hinges or Just the Worn Ones?
Replace only the worn hinges, unless others show wear, to keep balance intact. Practice hinge maintenance now and then, and reinforce the gate as needed. This small attention builds belonging and adds lasting gate reinforcement and confidence.
What Safety Precautions Should I Take During Repair?
You should wear safety gear, stay alert for electrical hazards, and keep a clear workspace. Use gloves, eye protection, and sturdy footwear, and disconnect power when handling components to protect yourself and keep everyone feeling secure.