To check your home’s insulation level, start with your walls, attic, and crawl spaces. Look for drafts, cold spots, and uneven temps, and use an infrared thermometer or a flashlight to spot gaps. Measure insulation depth and inspect for moisture or compression. Note any high HVAC cycling or rising bills, then compare to your climate’s recommended R-values. If gaps or moisture show up, plan targeted upgrades. Want practical steps and when to hire a pro? You’ll find them ahead.
Why Insulation Matters for Comfort and Energy Bills
Insulation matters because it keeps your home comfortable and lowers energy bills. When you trap heat inside in winter and keep it out in summer, you experience steadier temperatures without cranking the thermostat. That stability isn’t just about warmth; it’s about predictable comfort you can rely on every day.
Good insulation also protects your walls and floors from moisture fluctuations, which helps reduce drafts and cold spots that make you feel unsettled. To maximize effectiveness, you should address thermal bridging, which creates weak spots where heat escapes.
Likewise, ensure vapor barriers are properly installed to prevent condensation that can degrade insulation over time. Prioritizing these details helps you enjoy a more efficient, welcoming home that respects your household’s comfort and budget.
How to Gauge Your Current Insulation Level
To gauge your current insulation, start with the exterior walls to check for cold spots or drafts.
Then consider the attic or basement access to see if any gaps, cracks, or missing insulation are obvious.
Use these two points to guide a more detailed assessment and potential upgrades.
Exterior Wall Temperature
Exterior wall temperature is a practical gauge of your insulation level. You’ll notice cooler spots along exterior walls where insulation isn’t doing its job, and warmer areas where it performs well.
To assess, you don’t need fancy gear—just a basic infrared thermometer or a simple touch test on an evening when indoors and outdoors differ. Focus on exterior walls that face the prevailing winter wind; persistent cold patches signal thermal bridging, where framing or structural elements bypass insulation.
Compare interior surface temperatures to expected norms for your climate, noting consistency across rooms. Document variances and consider upgrading where gaps persist.
This awareness builds confidence, connects you with lasting comfort, and reinforces that choosing better insulation strengthens your home’s belonging and efficiency.
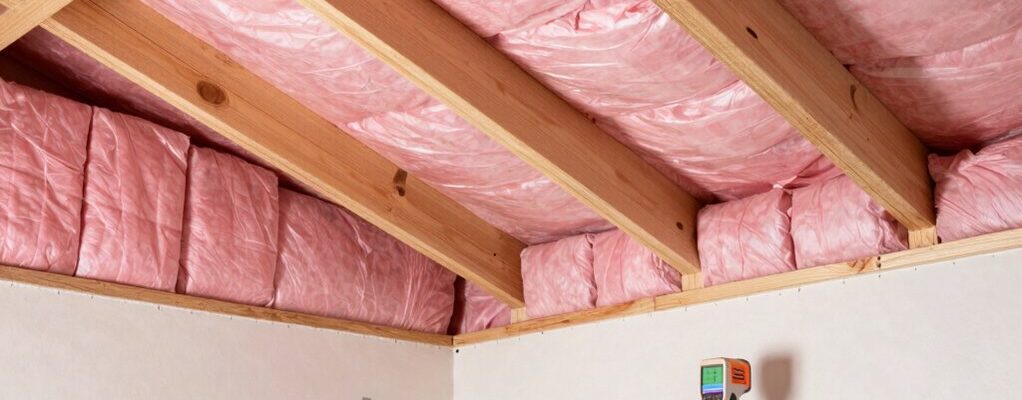
Attic Or Basement Access
Have you checked your attic or basement access lately to gauge insulation performance? If you access these spaces, you’re already taking control of comfort and energy savings.
Look for obvious gaps where insulation ends, and note any missing baffles that could cause ventilation issues. Check that insulation isn’t compacted or pinched near outlets, pipes, or ducts.
In the attic, verify that hatch seals are intact and that the pull-down ladder, if present, doesn’t create drafts.
In basements, inspect rim joists and exposed walls for missing insulation or air leaks.
Be alert for moisture problems like staining, mildew, or damp insulation, which signal moisture intrusion. Addressing these quickly preserves efficiency and helps you feel confident in your home’s performance.
Signs Your Insulation Is Underperforming
If you notice drafty rooms or chilled floors, that’s a quick sign your insulation isn’t doing its job.
Look for rising energy bills and inconsistent temperatures, which signal performance decline over time.
These indicators point to where to start inspecting or upgrading your insulation.
Insulation Quick Signs
If you notice drafts, cold spots, or uneven comfort, your insulation may be underperforming. Quick signs are practical to spot this week, not next season. You’ll feel heat leaking near electrical outlets, doors, and windows, and you may notice frost or condensation on walls in winter.
Look for suddenly higher heating or cooling bills, unexplained humidity, or musty odors that hint moisture problems. Pay attention to thermal bridging where studs or framing bypass insulation, creating chilly lines along walls or ceilings.
Gaps around attic hatches, recessed lights, and plumbing penetrations also expose you to loss. Check moisture barriers; damaged or missing barriers can worsen drafts.
If these signs appear, plan a targeted upgrade rather than broad, costly overhauls to restore comfort and energy efficiency.
Performance Decline Indicators
Signs your insulation is losing its edge often show up in everyday living. You’ll notice rooms that don’t stay consistently comfortable, drafts near outlets, and cold spots that defy your thermostat. Performance decline shows up as increased energy bills, longer cycling from your HVAC, and equipment running more often without meaningful comfort gains.
Watch for obvious thermal bridging where studs or structural gaps conduct heat, plus hidden weak spots behind walls or ceilings. If you detect moisture or condensation around vapor barriers, you’re likely risking mold and reduced effectiveness.
These signs point to insulation that’s aging or improperly installed, needing assessment, resealing, or upgrading. Addressing problems promptly preserves comfort, lowers costs, and protects your home’s overall performance.
Quick DIY Tests You Can Do Today
Want to gauge your insulation quickly? Here are practical, quick DIY tests you can do today.
First, feel for drafts in doorways, windows, and outlets. If you notice a breeze, you likely have gaps to seal.
Next, perform a simple flashlight test at night: shine a bright light around window frames and attic hatches with someone outside to spot leaks.
Check for condensation on cold surfaces, which signals poor insulation.
Use a thermostat swing test: monitor inside temperature changes when you turn heating or cooling on for short periods—rapid swings suggest efficiency issues.
Improve with low-cost fixes: install draft stoppers, add inexpensive weatherstripping, and try thermal curtains where heat loss is common.
These steps build comfort and belonging while you upgrade.
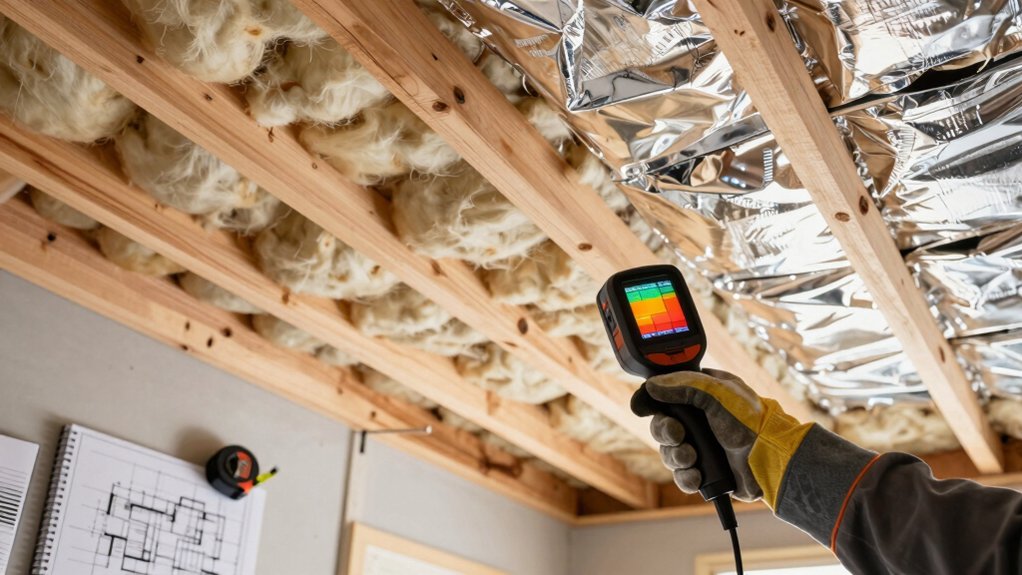
Test Attic Insulation: Step-By-Step
To test attic insulation effectively, start with a precise, hands-on check of insulation depth and uniformity. You measure with a ruler or tape, noting actual thickness at multiple points and comparing to your attic’s target spec. Look for gaps, compressions, and signs of settling that indicate reduced performance.
Use a thermal imaging scan to spot cold spots and draft paths without invasive probing. A blower door test helps quantify overall airtightness and reveals leaks surrounding eaves or hatch openings.
Document findings, then map where upgrade is most needed. Prioritize adding insulation where depths fall short and sealing air leaks around access doors and penetrations. This method gives you a clear path to improve comfort, energy use, and home value.
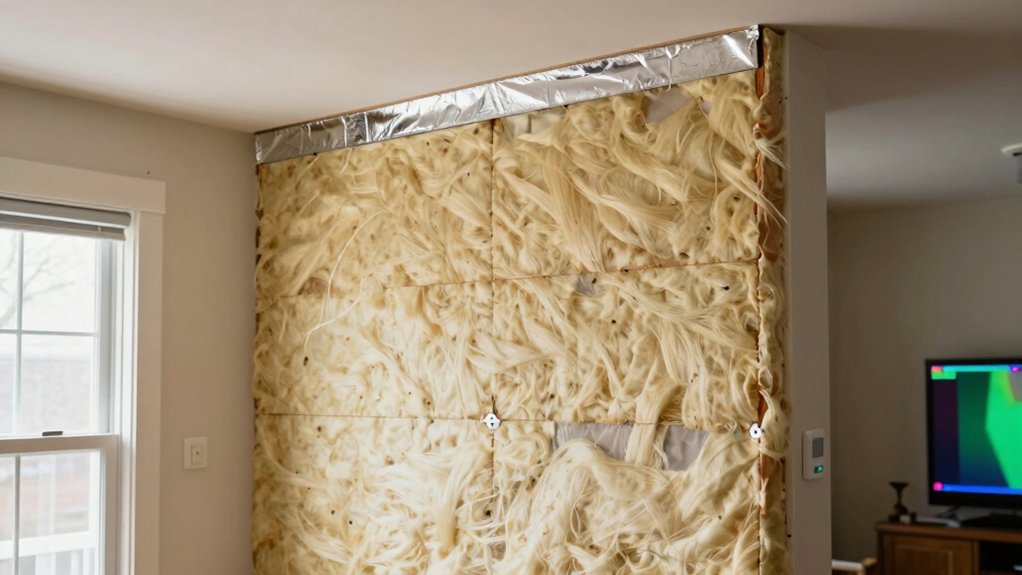
Check Walls and Floors Without Heavy Demo
You can peek behind wall coverings at accessible spots to spot hidden gaps or missing insulation.
Inspect floorboards for gaps by looking for drafts, light, or squeaks that signal thermal leaks.
Use simple tools like a moisture meter or a flashlight to guide your checks without lifting heavy materials.
Peek Behind Wall Coverings
If you want to assess insulation without tearing into walls, start by peeking behind coverings with simple, noninvasive checks. You’ll look for obvious gaps, drafts, and temperature changes near outlets, switches, and baseboards.
Remove a small portion of wall coverings or access a vented closet to feel for cold spots that signal missing or poorly installed insulation materials. Check attic hatch seals and rim joists from adjacent rooms to gauge overall continuity.
Use a flashlight to spot discolored or sagging insulation through small openings, and listen for sounds of wind leaking through wall cavities.
With this approach, you gain practical clues, build confidence, and belong to a practical, informed community focused on comfort and efficiency. wall coverings, insulation materials.
Inspect Floorboards For Gaps
Even without heavy demolition, you can spot floorboard gaps by walking the rooms and listening for drafts, then verifying with quick, hands-on checks. You’ll feel connected to your home as you test comfort and warmth, focusing on where cold air sneaks in through floor gaps.
Use a flashlight to spot light under gaps, and press gently along boards to detect looseness. If you hear squeaks or feel cold air near crawl space access, note it for sealing.
Keep an eye on the perimeter and consider draft stoppers under doors too. This mindful approach helps you recognize gaps early, making your home cozier and more energy-efficient.
- Notice floorboard gaps that whisper of drafts
- Inspect around crawl space access for hiding leaks
- Test with light and gentle pressure, not force
- Prioritize quick, practical sealing fixes
- Create a plan for ongoing insulation checks
What R-Values Mean for Your Climate
R-values measure how well insulation slows heat flow, and the right number depends on your climate. Think of it as thermal resistance that keeps warmth in during winter and out during summer.
In practice, your target R-value varies by climate zones, so what works for one area won’t be ideal for another. You’ll often see higher R-values recommended for colder regions and modest boosts for milder ones.
When you compare materials, focus on the overall R-value rather than unique claims of single components. Your home’s orientation, attic access, and air leaks also influence effective performance.
Use local guidelines as a baseline, then tailor upgrades to your comfort needs and energy goals. With the right R-values, you’ll feel steadier temperatures and steadier bills.
Cost-Effective Insulation Upgrades
One of the fastest, most cost-effective ways to cut heating and cooling costs is to start with targeted insulation upgrades that don’t break the bank. You can often achieve big gains without a full overhaul. Focus on gaps, corners, and access points, then choose practical, proven insulation materials.
Look for compact, peel-and-stick or batt solutions that fit your exact space. Eco friendly options let you improve comfort while reducing environmental impact. Prioritize tight sealing around doors, windows, and attic hatches to maximize every dollar.
Use a simple plan: test, patch, seal, insulate, and test again. Your home will feel cozier, and your monthly bills will reflect the improvement.
- Target gaps and leaks for immediate impact
- Choose tight-fitting batt or foam board options
- Prioritize attic, crawl spaces, and ducts
- Opt for eco friendly options when possible
- Plan a quick recheck after upgrades
When to Hire a Pro for Upgrades
When you’ve tackled targeted upgrades and still feel uneven comfort or high bills, it’s time to contemplate bringing in a pro. A DIY assessment can reveal gaps you might miss, but a professional consultation adds precision, codes, and practical logistics.
You’ll know when repairs or upgrades are needed, not just felt symptoms, and you’ll avoid guesswork. Hire a licensed contractor or insulation specialist who explains options in plain terms and offers clear cost ranges, timelines, and expected savings.
If your home has uneven temperatures, persistent drafts, moisture issues, or unusual attic or wall access challenges, it’s a strong signal to seek expert input. Trustworthy pros document findings, respect your budget, and collaborate so you feel confident in the next steps.
Choosing an Insulation Plan That Fits Your Home and Budget
Choosing an insulation plan that fits your home and budget starts with a clear picture of your goals and constraints. You’ll compare insulation materials, upfront costs, long‑term savings, and local climate to choose a plan that feels right for you and your family.
Prioritize comfort, energy bills, and resale value, then pair that with practical budgeting strategies to avoid buyer’s remorse. You want a solution that preserves space, reduces drafts, and lasts.
Involve your household in the decision so everyone feels ownership and belonging. Focus on proven performance, not hype, and balance price with value.
A thoughtful plan turns uncertainty into confidence, creating steady warmth and lower bills you can count on.
- Feel empowered by clarity, not pressure
- See progress with measurable savings
- Choose materials that align with your values
- Build a plan you can sustain
- Enjoy a home that fits your life and budget
Frequently Asked Questions
What Are Common Insulation Materials and Their Lifespan?
Like a shield protecting you, insulation types vary: fiberglass, cellulose, mineral wool, spray foam; each has different material lifespan. You’ll find fiberglass ~20–30 years, cellulose ~40, mineral wool ~80, spray foam ~30–50 with care.
How Does Insulation Affect Indoor Air Quality?
Insulation affects indoor air quality by reducing drafts and moisture migration, improving comfort while buffering pollutants; poor sealing can trap odors and allergens. Prioritize airtight construction and ventilation effects, using whole-house ventilation and balanced systems for safer, healthier air.
Can Insulation Improve Soundproofing in My Home?
Yes, insulation can improve soundproofing in your home. You’ll notice soundproofing benefits when you seal gaps and add dense insulation. Use noise reduction techniques like resilient channels and mass-loaded barriers for quieter living spaces.
Are There Incentives or Rebates for Upgrading Insulation?
Yes, you can save with insulation tax credits and rebate programs. You’ll qualify if you upgrade, keep receipts, and follow program rules; check local incentives, apply promptly, and claim benefits as you improve your home’s comfort and value.
How Long Does a Typical Insulation Upgrade Take?
On average, an insulation upgrade takes a few hours to a couple days, depending on scope. You’ll map an installation timeline, coordinate crew arrival, and finalize project planning to minimize disruption and maximize long-term comfort and energy savings.