Brick and mortar tuckpointing is the precision repair of deteriorated mortar joints to restore bond integrity and prevent moisture ingress. You’ll remove degraded material, match the mortar’s porosity, strength, and color to the brick, and refill with a compatible mix. Use proper tools, maintain consistent joint profiles, and control curing conditions to avoid cracks. This process preserves aesthetics while improving performance against freeze–thaw damage. If you keep exploring, you’ll uncover essential steps and contractor selection details.
Tuckpointing 101: What It Is and Why It Matters
Tuckpointing is the precision repair of mortar joints that restores both the appearance and structural integrity of masonry. You engage a technique that targets deteriorated joints, removing degraded material and refilling with compatible mortar. This process renews bond cohesion, reduces moisture ingress, and stabilizes walls against weathering.
By restoring joint profile and color, you preserve historical preservation values while maintaining modern performance expectations. You’ll appreciate how controlled tooling minimizes dust and debris, supporting safe, efficient work in occupied spaces.
The method protects substrate from freeze-thaw damage and mitigates brick spalling risks, enhancing long-term durability. Prioritizing compatibility, you ensure breathability and thermal efficiency remain intact.
In doing so, you reinforce structural integrity, uphold heritage, and secure the masonry’s ongoing service life.
Signs Your Brickwork Needs Tuckpointing Now
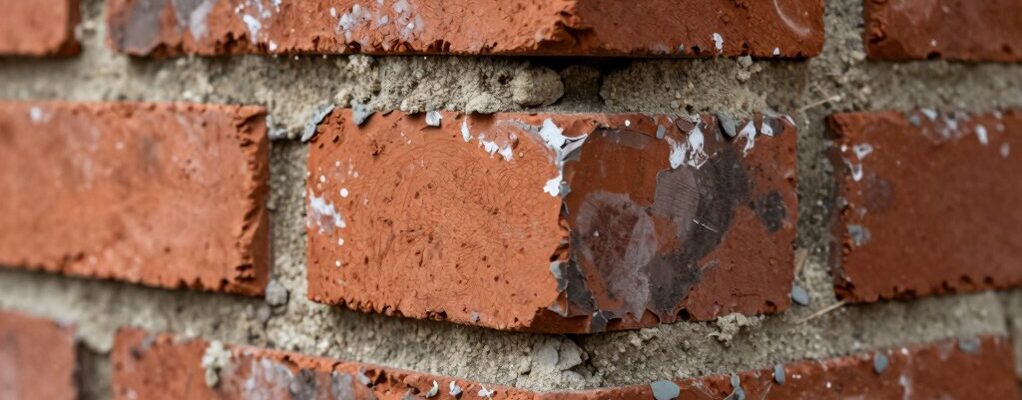
If you’ve just covered the benefits and mechanics of tuckpointing, you’re probably wondering when to act. You identify signs that indicate urgent maintenance needs, not mere cosmetic issues. Crumbling or missing mortar joints weaken bond integrity, allowing water ingress and freeze–thaw damage that accelerates deterioration.
Exposed bricks, efflorescence, or spalling reveal hidden moisture pathways and potential structural concern. Bond strength loss becomes apparent through shifting, cracking, or bulging masonry patterns.
Rising interior humidity and cold drafts near masonry walls signal compromised seals. Timely assessment supports Historical preservation goals by maintaining original material behavior.
A precise Cost analysis helps you weigh restoration versus replacement, prioritizing safety, longevity, and aesthetic continuity. Acting promptly protects value, community trust, and performance, aligning with responsible stewardship of built heritage.
Assessing Suitability: Matching Mortar, Brick Materials, and Prep
Evaluating suitability requires precise material matching and prep planning before work begins. You assess compatibility between mortar, brick materials, and existing joints to guarantee enduring bonding and color coherence, while respecting historic or aesthetic values.
You’ll prioritize long-term performance, not quick fixes, and you’ll craft a clear plan for surface preparation and material matching.
- Material matching: verify grout porosity, strength, and color to blend with the facade.
- Brick/material assessment: confirm clay, sedimentary, or glazed bricks respond to the same mortar chemistry.
- Surface preparation: schedule cleaning, efflorescence removal, and substrate conditioning for ideal bonding.
- Documentation: record mix ratios, curing expectations, and environmental controls to sustain consistency and belonging.
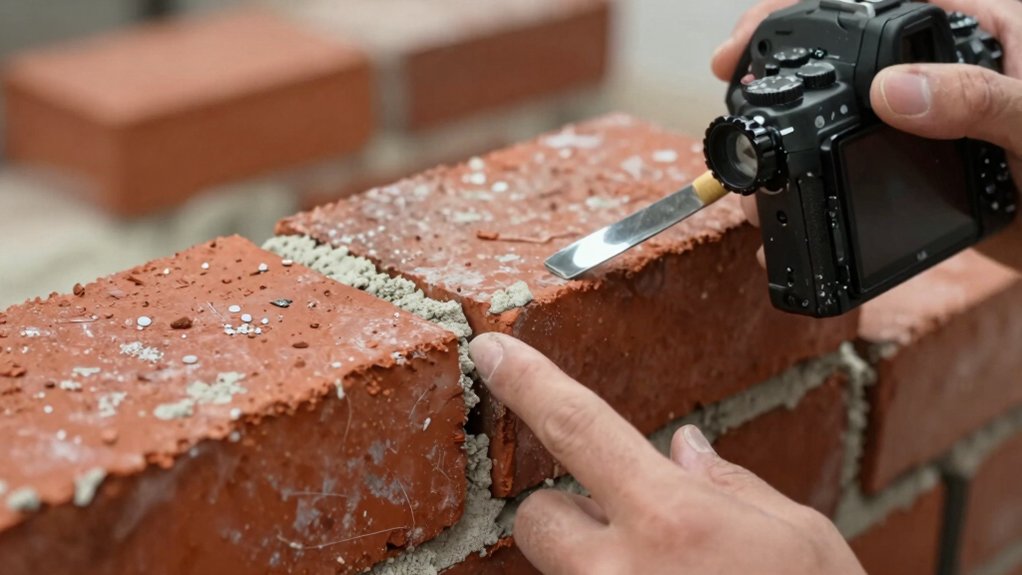
Tuckpointing Steps: Tools, Technique, and Curing
Combining the correct tools with a disciplined technique is essential for effective tuckpointing, as the process demands precise joint filling, bead width, and tooling to guarantee uniform color and bond. You’ll prepare a consistent mortar mix, achieving workable open time without segregation, which supports durable joints.
Apply mortar with steady, controlled strokes, and strike the surface to create a uniform bead profile that matches adjacent masonry. Tools must be maintained—trowels sharp, jointers clean, and caulking guns calibrated for accurate bead size.
Follow safety precautions, including eye protection, dust control, and ventilation, to minimize exposure and accidents. Cure under humidity and temperature guidelines, avoiding rapid drying that can cause cracking.
Documentation of mix ratios and curing conditions ensures repeatable performance and lasting aesthetic integrity.
Choosing the Right Mason: Questions to Ask and Project Scope
Choosing the right mason is critical to the success of your tuckpointing project, and you should begin by defining the scope, schedule, and quality expectations before inviting bids.
- Define budget considerations and project milestones to set clear financial and timing bounds.
- Verify contractor credentials, licenses, and insurer proof to ensure reliable accountability.
- Ask for prior tuckpointing samples and client references to gauge consistency and workmanship.
- Clarify deliverables, warranties, and decision points to align expectations with outcomes.
Ask precise, technical questions about mortar composition, compatibility with existing materials, and lintel or curve integrity.
Look for transparent estimates, detailed scoping documents, and a responsive project timeline.
Choosing wisely reinforces belonging within a skilled trade community that values accountability, clarity, and long-term performance.
Frequently Asked Questions
How Long Does Tuckpointing Typically Take on a Small Brick Repair?
You’ll usually see a time estimate of half a day to a full day for a small brick repair, depending on condition; plan for thorough material prep and your crew’s efficiency to guarantee solid, lasting joints.
Will Tuckpointing Affect an Existing Brick Exterior Warranty?
Tuckpointing may influence warranty protections slightly; consult your provider. You’ll want to verify Warranty implications with code-compliant work, and guarantee Brick exterior regulations are met, because adhering precisely preserves eligibility while maintaining your sense of belonging and confidence.
Are Power Tools Necessary or Can It Be Done Manually?
Power tools aren’t strictly necessary; you can complete it with manual techniques. However, tool necessity depends on mortar hardness and finish. You’ll gain precision, consistency, and belonging by mastering controlled, methodical manual techniques for reliable results.
How Often Should Tuckpointing Be Rechecked After Completion?
You should schedule inspection frequency every 1–5 years, depending on environment and performance, and maintain intervals consistently. You’ll monitor cracks, mortar softness, and moisture, and perform rechecks after severe weather, repairs, or nearby structural shifts for sustained integrity.
Can Tuckpointing Be Done on Painted Brick Surfaces?
Yes, you can tuckpoint painted brick, but you must strip and re-prime any paint, then guarantee proper surface preparation before re-pointing. Painted brick requires careful adhesion checks to maintain durability and a seamless, professional appearance.