
Cavity wall insulation problems often present as damp patches, drafts, or uneven walls, signaling possible installation faults or moisture ingress. You’ll want to detect mold risks, assess plaster integrity, and consider removal if contamination or structural concerns exist. Removal costs vary with wall size and damage, while targeted remediation may suffice in some cases. Before deciding, you’ll need a professional assessment to determine whether remediation or re-insulation best protects your home and health.
Common Causes of Cavity Wall Insulation Problems
Common causes of cavity wall insulation problems arise from installation defects, material incompatibilities, and moisture ingress. You assess how poor workmanship creates gaps, misaligned blocks, and incomplete sealant lines that promote thermal bridging and localized heat loss.
Incorrect material compatibility with existing wall ties, plaster, or brickwork can cause differential movement, settling, and delamination, increasing air transmission paths. Insulation compression occurs when installers overfill cavities or compress foam boards, reducing voids and diminishing thermal resistance.
Over time, vibration, structural shifts, or wind-driven pressure can degrade interfaces, creating bridging routes that bypass installed insulation. Inadequate drying times before sealing traps moisture, elevating sustained humidity and potential mold risk.
You must verify installation standards, material specs, and curing procedures to minimize these failure modes.
Detecting Damp Patches and Moisture Intrusion
Moisture trace indicators guide you to early signs of intrusion, enabling you to locate hidden moisture without dismantling walls.
Look for consistent damp patch patterns and their edges, which help pinpoint recent moisture movement and potential leaks.
Use intrusion source clues—such as external defects or flashing failures—to prioritize inspection steps and remediation actions.
Moisture Trace Indicators
Detecting damp patches and moisture intrusion requires a systematic approach to identify where water breaches occur and how it travels through walls. You focus on moisture trace indicators that reveal intrusion pathways without altering the wall structure. Use noninvasive methods first: visual inspection, infrared thermography, and moisture meters at likely junctions.
Note gradual increases in relative humidity, darkened plaster, or efflorescence as potential signs, then correlate with prime entry points such as exterior brick ties, window reveals, or coping joints. For leak detection, document seasonal variation and wind-driven leaks nearby openings.
Record measurements with precise timestamps and locations to build a moisture map. Confirm findings with targeted tests, ensuring isolation of the area to prevent false positives. Proceed to containment and remediation planning based on trace evidence.
Damp Patch Patterns
Damp patch patterns reveal where moisture has traveled through the wall and where intrusion begins. You’ll often identify these patterns as irregular halos, linear bands, or centered blotches that align with wall cavities.
Detecting thermal bridging helps explain why patches form at specific heights or across studs, as heat loss concentrates moisture migration in colder zones. Observe color changes, surface efflorescence, or paint peeling that tracks along joints, not random splotches.
Insulation compression inside the cavity can alter airflow and moisture pathways, creating unexpected damp corridors where insulation settles or gaps open. Use moisture meters and infrared scans to confirm elevated RH in affected zones.
Document patterns methodically, since consistent geometry helps distinguish transient damp from ongoing intrusion.
Intrusion Source Clues
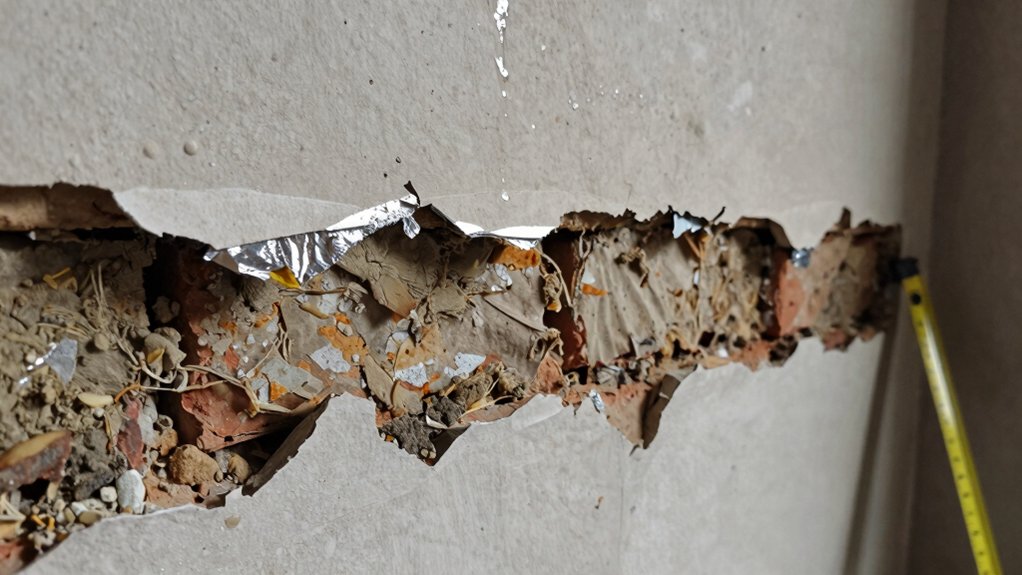
Crack open the wall for clues by tracing moisture intrusion to its source, using observed patterns of damp patches as your guide. You assess intrusion by mapping patch progression, noting color, edge sharpness, and whether damp extends vertically or horizontally.
Reliable detection hinges on correlating moisture indicators with cavity behavior: check for condensate on cold surfaces, efflorescence at masonry joints, and spongy plaster under coatings.
Identify potential intrusion points where insulation materials or installation techniques create gaps, voids, or thermal bridges. Examine exterior flashing, window perimeters, and vent penetrations for breaches.
Document shielded versus exposed areas, and distinguish between plumbing leaks and envelope-driven moisture. Accurate source localization informs remediation choices and guides selecting appropriate insulation materials and proper installation techniques.
Signs of Mold and Health Risks
What signs indicate mold growth and related health risks in cavity wall insulation systems? Mold often manifests as musty odors, visible stains, or dark patches on interior walls where moisture collects. You may notice persistent humidity, condensation on windows, or rapid indoor allergen symptoms, including sneezing, coughing, or throat irritation, especially after heating cycles.
Inspect for water intrusion around exterior brickwork, gaps, or damaged seals that enable thermal bridging and air leakage. Moisture meters or infrared imaging can reveal hidden dampness behind insulation layers.
Mold grows where humidity stays above 60%, so ongoing damp conditions pose health risks. Promptly address leaks, improve ventilation, and consider professional remediation. _Make certain_ materials meet moisture resistance standards to mitigate recurring mold and associated respiratory concerns.
What Drafts Tell You About Insulation Performance
Drafts are a direct indicator of insulation performance because they reveal where unintended air movement occurs. When you feel air at outlets, around windows, or along wall junctions, you’re detecting routes of air leakage that bypass your cavity insulation. These drafts often point to gaps, misaligned materials, or compromised seals that create thermal bridging, allowing heat to transfer through denser or poorly insulated paths.
You’ll notice that persistent drafts correlate with uneven temperature distribution across rooms and can undermine comfort despite high batt or foam density. By localizing air leakage sources, you can prioritize targeted sealing, dampproofing, and ventilation adjustments.
Remember that reducing drafts improves overall system efficiency, mitigates heat loss, and supports the cavity wall’s intended thermal performance.
Structural Impacts: Collapsed Plaster and Wall Damage
You may notice plaster cracks or bulging where the cavity wall is compromised, signaling potential collapsed plaster. These indicators align with visible wall distortions and misaligned finishes, suggesting structural stress beneath the surface.
Evaluating both plaster indicators and wall damage signs helps you gauge integrity and prioritize professional inspection.
Collapsed Plaster Indicators
Collapsed plaster signs indicate structural distress from cavity wall issues, revealing cracked bonds, bulging panels, or sudden depth changes behind the plaster. You should recognize these indicators as potential precursors to wall failure rather than cosmetic defects.
When plaster yields under load, it often reflects hollow or misaligned framing, misplaced insulation supports, or degraded veneer lath. In service, these changes can create thermal bridging, concentrating heat transfer at vulnerable studs and reducing overall insulation effectiveness.
You may also observe localized air leakage where gaps form between layers or through cracked joints, undermining indoor air quality control.
Assessments must quantify the extent of movement, distinguish plaster failure from surface moisture, and prioritize stabilizing repairs before addressing underlying cavity integrity. Accurate documentation informs cost and remediation strategy.
Wall Structural Damage Signs
Structural damage signs from wall systems reflect direct impacts on cavity wall integrity and insulation performance. You’ll observe cracked or bulging plaster, shifted reference marks, and misaligned fixtures where framing geometry has stressed.
Look for gaps around electrical boxes, doors, and windows that reveal substrate movement or settlement. Structural compromise often accompanies sagging ceilings or uneven plaster layers, indicating load redistribution and potential timber or metal frame damage.
Thermal bridging may appear as localized cold spots near exposed studs, while air leakage around joints increases energy loss and moisture infiltration. Addressing these signs promptly reduces escalation to more extensive remediation.
You should commission a qualified survey, document movement patterns, and develop a targeted repair plan to restore stability, minimize heat loss, and re-seal vulnerable junctions.
Assessing Whether Removal Is Necessary

Evaluating whether removal is necessary starts with a clear inventory of the issues observed in the cavity wall system. You should document moisture intrusion, mold signs, cold bridges, pest activity, and significant settling or blockages that impede effective insulation performance.
Assess the material type and its condition, noting friability, compaction, and repurposed fillers that may compromise thermal integrity. Compare measured temperature differentials and humidity levels against design specifications to identify underperforming zones.
Evaluate ventilation adequacy and airtightness, since poor control can amplify energy losses. Consider whether remediation options could restore performance without full removal.
If persistent cold spots, high dampness, or deteriorated insulation persist after targeted repairs, removal may be warranted. Balancing energy efficiency gains with potential risks will guide a data-driven decision on necessity and scope, including noise reduction considerations.
Cost Breakdown: Removal vs. Remediation
Cost considerations hinge on whether you remove the cavity insulation or pursue targeted remediation. Removal generally incurs higher upfront costs due to debris disposal, material handling, and potential re-plastering, but can yield long‑term savings if contamination exists.
Remediation focuses on addressing specific defects, such as sealing gaps, replacing damaged sections, and upgrading seals, reducing waste and labor time but potentially leaving underlying issues if diagnostics miss hidden moisture paths.
A careful assessment should quantify per‑square‑meter costs, required materials, and labor hours for each approach. Consider thermal bridging and air leakage implications: removal may dramatically alter thermal performance, while remediation targets leak paths to restore efficiency.
Ultimately, choose the option with verifiable performance gains, balanced against budget, disruption, and long‑term energy savings.
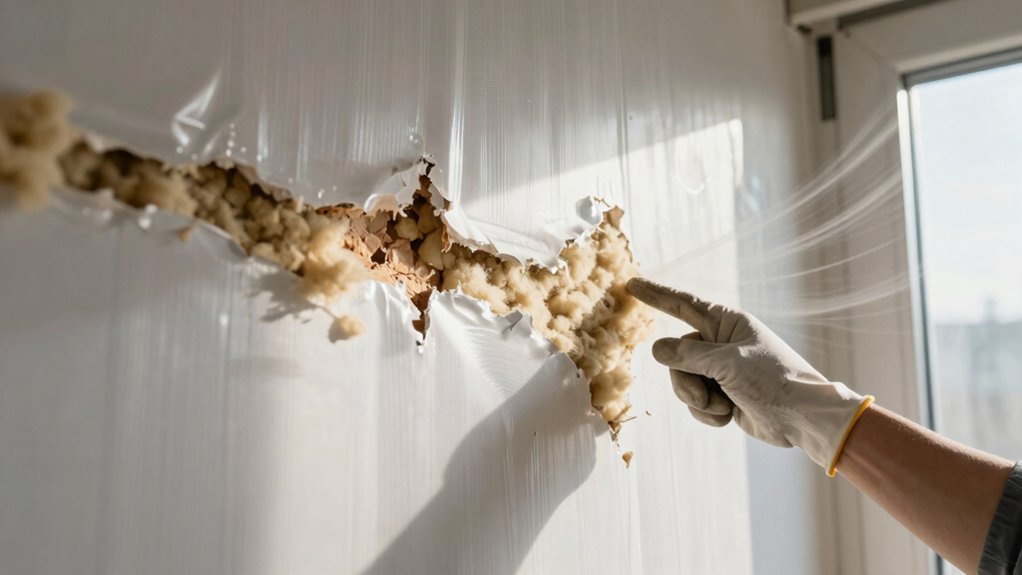
Safety Considerations During Inspection and Removal
When inspection or removal proceeds, you must prioritize人员 safety and contaminant control from the outset. You should establish a confined work zone, seal off drafts, and use appropriate containment to prevent fiber spread.
Wear approved PPE, including respirators rated for nuisance dust, disposable coveralls, gloves, and eye protection, and ensure decontamination procedures for reusable gear.
Identify fire hazards linked to displaced materials, ignition sources, and near-complete combustion risks; plan temporary shutdowns of nearby heat or electrical equipment if needed.
Maintain clear electrical safety protocols: de-energize circuits as required, verify absence of live components, and isolate outlets in the workspace.
Implement dust monitoring, air sample logging, and waste management steps to minimize exposure during handling and removal.
Conclude with post-removal clearance testing and documented safety sign-offs.
Making an Informed Decision: Should You Install or Replace Cavity Wall Insulation
Careful assessment should guide whether to install new cavity wall insulation or replace existing material. You’ll evaluate retrofit viability by inspecting wall structure, moisture risk, and existing insulation condition.
Consider ventilation issues; improper air exchange can elevate humidity and foster mold, undermining efficiency. Begin with diagnostic tests for air permeability and thermal performance, then compare insulation materials in terms of R-value, moisture tolerance, and compatibility with your walls.
If current material shows degradation, bridging costs, or compaction, replacement may outperform new installation. Budget constraints, building orientation, and long-term energy targets influence the choice.
Make certain you prioritize vapour control layers and sealed junctions to prevent condensation. Select materials aligned with climate, occupancy patterns, and retrofit scope to achieve reliable, safe, and cost-effective outcomes.