
A complete bathroom renovation typically runs $10,000 to $25,000 for mid-range finishes, with costs driven by fixtures, materials, and labor. Start with demolition and site prep, then essential plumbing and electrical upgrades. Invest in waterproofing and moisture barriers to protect your investment. Choose fixtures—toilets, sinks, showers, baths—carefully for durability and maintenance. Add energy and water-saving upgrades for long-term savings. Build in a contingency and plan timing; you’ll see how choices affect overall value as you progress. More details ahead.
Key Takeaways
- Break down costs by major categories: demolition/site prep, plumbing/electrical/waterproofing, fixtures/finishes, cabinetry/storage, and design/permits.
- Include labor, materials, and contingencies (3–15%); add 15–25% for complex plumbing/electrical layouts.
- Estimate fixture counts, tile size/patterns, and finish options to impact labor and material totals.
- Account for waterproofing membranes, moisture barriers, and inspection/warranty costs in total.
- Budget for ongoing maintenance, potential upgrades (LED lighting, low-flow fixtures), and future resale value.
Set a Realistic Bathroom Renovation Budget Up Front
Setting a realistic budget upfront prevents scope creep and keeps the project on track. You’ll begin with a clear baseline: define your must-haves, then assign real costs to each item. Quantify labor, materials, and contingencies, using current market data to anchor expectations.
You’ll compare different price tiers for fixtures, cabinets, and waterproofing, identifying value without compromising durability. Track potential overages by estimating waste, shipping, and installation time, then set a formal contingency buffer—3 to 15 percent, depending on complexity.
For bathroom aesthetics, forecast how finishes influence cost per square foot and long-term maintenance. Consider tile patterns and trim options as design leverage that can alter labor intensity and material cost.
Your goal is a lean, defensible budget that supports decisive sourcing and timely decision cycles.
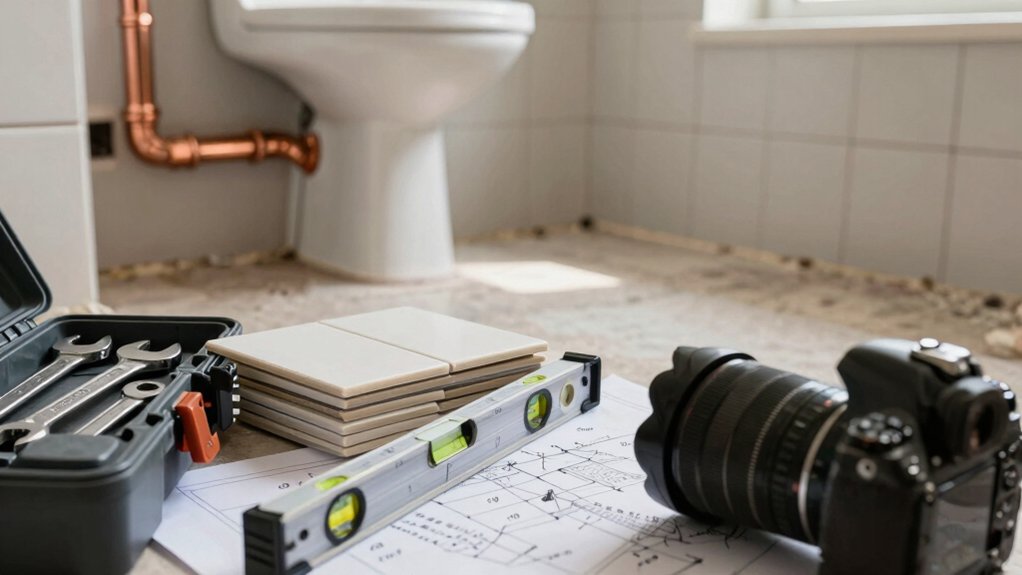
Demolition and Site Prep: What You Need to Plan For
You’ll want a clear plan for site safety essentials and debris removal before you start demolition. Establish guardrails, PPE, and dust containment.
Then, map a debris removal timeline and turnaround. This minimizes disruption, protects occupants, and keeps you on schedule and budget.
Site Safety Essentials
Before starting demolition and site prep, prioritize safety by outlining the exact scope, securing permits as required, and isolating the work area to prevent accidental exposure and injuries.
You establish a site safety plan with accessible contact points, emergency shutdown procedures, and clearly marked exclusion zones.
Pre-demo checks include utility de-energization, gas line verification, and asbestos or lead screening where applicable.
Implement fall protection, dust control, and personal protective equipment standards aligned to local codes.
Train crew on hazard prevention and incident reporting, conducting a pre-task hazard assessment before each phase.
Use containment barriers and negative-pressure containment for trades in confined spaces.
Maintain daily safety briefings, inspection logs, and near-miss tracking.
This disciplined approach delivers measurable safety metrics, reduces downtime, and reinforces safety precautions across the project.
Debris Removal Plan
A well-planned debris removal process starts with identifying all waste streams from demolition, including concrete, wood, metal, drywall, and hazardous materials, and defining acceptance criteria for each.
You’ll establish roles, timelines, and mass balance targets to optimize hauling and disposal costs. Prioritize source separation to maximize recycling rates and minimize landfill days.
Implement a documented chain of custody for loads to support compliance and traceability in debris disposal and waste management.
Use quantified metrics to track volume, weight, and disposal method by category, updating the plan as demolition progresses.
Align with local haulers, permits, and recycling facilities to secure predictable costs and schedules.
- Define waste streams and acceptance criteria
- Schedule, cost targets, and supplier coordination
- Compliance-driven load tracking and reporting
Essential Plumbing and Electrical Upgrades: Costs and Choices
Upgrading essential plumbing and electrical systems can considerably impact safety, efficiency, and long-term costs, so start with a clear plan that matches your bathroom’s design and usage.
You’ll quantify needs by fixture count, amp draw, and codes, then map trends for future upgrades. Plumbing upgrades should prioritize supply and waste routing, pressure balance, and code-compliant venting, aiming for leak-proof joints and durable materials.
Electrical enhancements focus on dedicated circuits, GFCI protection, arc-fault protection, and optimized lighting loads. Budget ranges hinge on fixture quality, pipe材e, and labor intensity, with contingencies for permit and inspection fees.
Expect 15–25% added for contingencies on complex layouts. Prioritize water-saving fixtures and intelligent controls to maximize efficiency, longevity, and resale value.
Waterproofing and Moisture Barriers That Protect Your Investment
You’ll want reliable moisture barriers and moisture-avoidance strategies to protect your investment from future water damage.
In this section, we’ll compare barrier types, installation timing, and long-term dryness performance to quantify upfront costs and long-run savings.
We’ll focus on moisture barrier installations and long-term dryness solutions to frame a data-driven view of value and risk.
Moisture Barrier Installations
Moisture barrier installations, including waterproofing membranes and vapour barriers, form the first line of protection against mold, rot, and structural damage in a bathroom renovation. You’ll choose moisture barrier types based on substrate, climate, and wet area exposure, then apply installation techniques that maximize adhesion and shear resistance.
Proper sequencing matters: assess framing, prep surfaces, and specify compatible products to meet building code. Measured costs reflect material performance, substrate compatibility, and warranty duration, guiding you toward a durable enclosure that reduces future leak-related repairs.
Precision in detailing seams, penetrations, and progressions prevents hidden failures and extends tile life while maintaining indoor air quality.
- Key moisture barrier types and their use cases
- Step-by-step installation techniques for reliability
- Inspection, testing, and warranty considerations
Long-Term Dryness Solutions
Durable long-term dryness starts with proven waterproofing and moisture-barrier strategies that align with your substrate, climate, and planned use. You prioritize decisive protection, so you select moisture barriers rated for your environment, then install at every vulnerable junction—baseplates, shower enclosures, and transition points.
Evaluate permeability, not just thickness, to minimize capillary rise and vapor diffusion. Implement a continuous membrane system with properly lapped seams and reinforced corners, plus rigorous substrate prep to prevent delamination.
Schedule pre- and post-install inspections, confirming adhesion, cure, and drainage slope compliance. Document material certifications, warranty terms, and maintenance milestones to sustain performance.
These long term solutions reduce failure risk, lower renewal costs, and preserve resale value. You gain predictable moisture control, making your bathroom investment steadfast and resilient.
Moisture barriers empower enduring, high-confidence results.
Fixtures You’ll Use Every Day: Toilets, Sinks, Showers, and Baths
When choosing daily-use fixtures, prioritize reliability, water efficiency, and ease of maintenance, since toilets, sinks, showers, and baths are used repeatedly every day.
You’ll optimize performance by selecting models with proven flush efficiency, low-flow rates, and durable materials. Focus on toilet installation and sink fixtures that minimize leaks and maintenance calls, backed by manufacturer data and independent tests.
In showers and baths, compare flow rates, temperature stability, and curb appeal without compromising function. Prioritizing these factors reduces long-term costs and downtime, empowering you to command comfort and efficiency in a high-demand space.
Plan for warranty terms, service accessibility, and recommended replacement cycles to sustain peak performance over time.
- High-efficiency options with verified specs
- Quick-access service and robust warranties
- Clear, data-backed maintenance schedules
Finishes and Materials: Tile, Cabinets, Countertops, and Paint
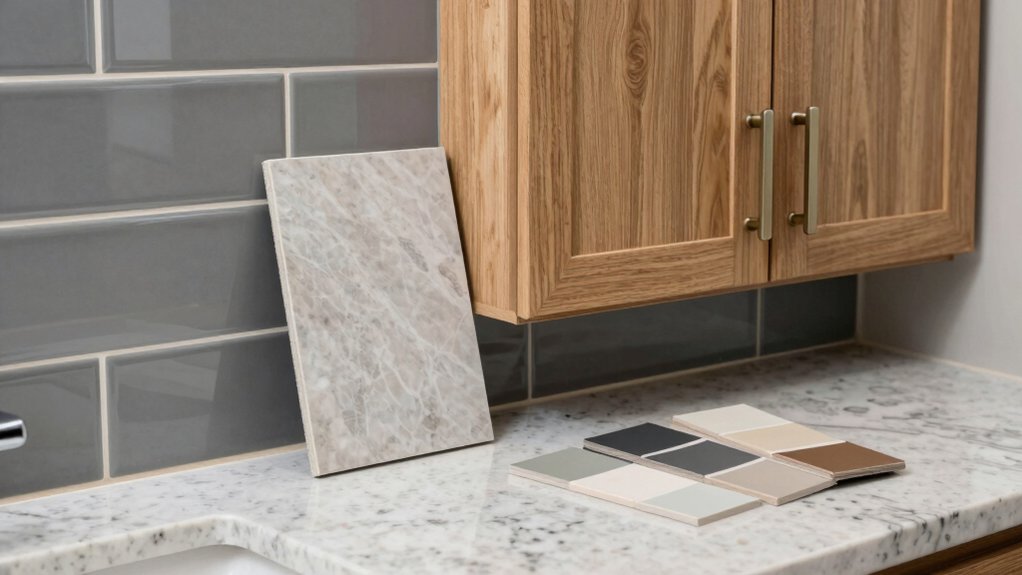
Tile selection costs will largely drive the budget, so you’ll compare material grades, sizes, and installation complexity to estimate per-square-foot prices.
Cabinet and countertop finishes affect both upfront cost and maintenance, so you should model durable surfaces and edge profiles against your aesthetic goals.
We’ll quantify trade-offs between durability, stain resistance, and long-term upkeep to inform your selections.
Tile Selection Costs
What varies most in tile selection costs is the material type and size, since these choices drive both material and installation rates. You’ll see price tiers from basic ceramic to premium porcelain, natural stone, and large-format panels, with size amplifying waste and labor.
Material selection directly influences durability, water absorption, and maintenance, shaping long‑term value beyond upfront costs. Expect thinner, precise cuts to add minutes and waste to labor, particularly for intricate layouts.
Overall, total tile costs hinge on material grade, size, and pattern complexity, plus grout and sealing requirements that protect against moisture.
- Material selection and size dictate both material and installation costs
- Compare durability, moisture resistance, and maintenance profiles
- Factor waste, cuts, and layout complexity into the budget
Cabinet and Countertop Finishes
Cabinet and countertop finishes add both aesthetic appeal and long‑term value, and they hinge on material choices, coating types, and edge profiles. You’ll weigh cabinet finishes by durability, moisture resistance, and maintenance, prioritizing coatings like catalyzed lacquer or UV‑cured polyurethane for high‑traffic bathrooms.
For countertops, evaluate substrate stability, heat resistance, and stain tolerance; options include solid surface, quartz, and granite, each with distinct edge profiles and seam considerations. Budget impact comes from veneer versus solid wood for cabinets, and from surface hardness and repairability for countertops.
You’ll compare performance data, warranty terms, and lifecycle costs to avoid premature replacement. In practice, cabinet finishes and countertop options drive both daily usability and resale value, guiding decisive material and finish selections.
Vanities and Storage That Add Real Value
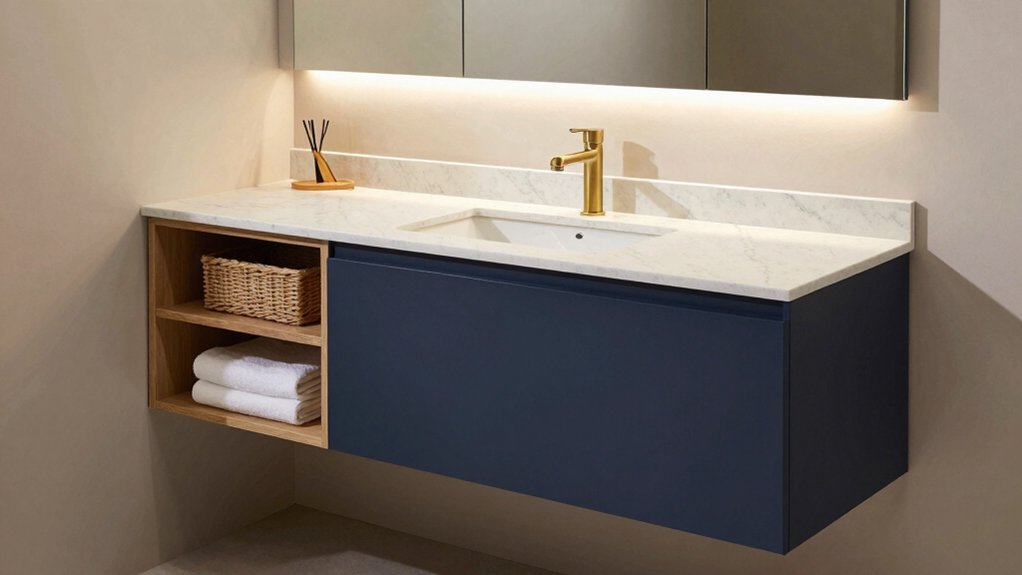
Vanities and storage choices directly influence bathroom usability and resale value. You’ll optimize space with targeted vanity styles that maximize drawer depth, under-sink access, and countertop real estate. Choose storage solutions that minimize clutter while boosting daily efficiency, measured by user hours saved and organization density.
Solid planning yields higher ROI when you align depth, height, and accessibility with your workflow, not just aesthetics. Expect clearer sightlines, faster grooming, and reduced repairs from durable materials. Data supports premium cabinetry with soft-close drawers and integrated lighting as high-value upgrades.
Pair with modular storage that scales to family needs, preserving resale appeal.
- Prioritize vanity styles and integrated lighting to boost perceived value
- Implement modular storage solutions for adaptable layouts
- Compare drawer depth, hardware quality, and moisture resistance for longevity
Labor vs. Materials: How Costs Break Down by Trade
Labor costs and materials form the two halves of a bathroom renovation budget, and understanding their split helps you forecast total expense with precision. You’ll see labor dominate in plumbing, electrical, and tile installation, while materials drive cabinet, fixture, and finish choices.
A clear cost comparison shows trades vary by region, scope, and deadline, so you must benchmark each line item against recent bids. Material sourcing matters: bulk purchases or negotiated supplier pricing can trim pounds of waste and reduce transit delays.
Track lead times, warranty terms, and substitution options to keep cash flow steady. Your plan should quantify labor hours per task and map them to unit costs, then overlay material costs to reveal the true project delta.
This approach empowers decisive budgeting and smarter procurement.
Design Packages: DIY Paths vs. Hiring a Pro
Design packages set the pace and price for your bathroom project, outlining whether you’ll tackle the layout and finishes yourself or bring in a pro for design guidance, specifications, and procurement. You’ll weigh DIY options against professional costs, tracking decision impact on timelines, quality, and risk.
Data shows DIY design saves money upfront but may extend build time and require reworks; pro packages add upfront certainty and material sourcing efficiency, often reducing waste. Your choice should reflect scale, complexity, and tolerance for revisions.
Compare deliverables, warranties, and who handles permits. Informed buyers optimize value, not just price.
- Clear scope and deliverables show cost-to-value differences
- Timeline alignment improves execution speed
- Risk and warranty coverage vary by path
Energy and Water Efficiency Upgrades That Save Money

Upgrading for energy and water efficiency cuts ongoing costs while boosting comfort, and the most impactful moves are measurable and cost-effective. You gain return by targeting lighting fixtures and ventilation systems with performance data in mind.
Replacing incandescent lamps with LEDs reduces energy use by 75% and lasts decades, supporting a faster payback. Choose dimmable, high-CRI LEDs to preserve ambiance without waste.
For ventilation, install to-code, fabric-graded fans with heat recovery options and variable-speed control; these systems cut humidity-related damage and energy draw by 40% or more.
Water efficiency matters too: low-flow faucets and dual-flush or pressure-assisted toilets reduce consumption with little behavioral change.
Combine smart sensors with timers to avoid phantom loads, and document energy savings to justify upfront costs. Continuous monitoring ensures sustained value.
Contingencies and Timelines: Managing Delays and Extra Charges
Delays and extra charges are a planning reality in bathroom renovations, so you should build contingencies into your schedule and budget from the start. You’ll protect overall timing and cost when you quantify risk, set clear milestones, and reserve a contingency fund.
Track suppliers, permits, and subcontractor availability weekly to anticipate unexpected delays and adjust as needed. Establish a baseline timeline with buffers for critical tasks like plumbing rough-in and tile installation, then monitor variances against it.
Make contingency decisions quickly using predefined thresholds for scope changes and impact on productivity. Communicate changes promptly to stakeholders to avoid renegotiations that trigger extra charges.
- Establish a time-buffered schedule with explicit milestones
- Define a contingency fund and trigger-based escalation
- Monitor permits, lead times, and subcontractor availability regularly
Financing and Payment Strategies for Your Renovation
Financing a bathroom renovation requires a clear plan that aligns funding to your milestones and contingencies. You assess total project cost, then map each phase to available financing options and expected cash flow.
Short-term loans reduce interest exposure if you front-load labor-heavy work, while lines of credit offer flexibility for scope changes. Compare annual percentage rates, fees, and draw schedules to minimize cost risk.
Payment plans should align with milestone completion, ensuring you don’t overpay before results prove value. Leverage supplier financing only if terms improve your liquidity without harming overall cost.
Maintain a reserve for contingencies and avoid predatory terms. Document all agreements, track draws against progress, and re-evaluate periodically to preserve financial control throughout the renovation.
Value-Driven Upgrades: Prioritize Impact Without Overspending
Prioritizing value means selecting upgrades that deliver measurable impact on daily use and long-term durability while staying within budget. You’ll maximize ROI by choosing elements with strong performance data and low lifecycle costs, tying decisions directly to budget planning targets and expected maintenance.
Focus on high-utility changes that reduce future expenses, not ego-driven tweaks.
- Prioritize luxury features with proven durability and energy savings to boost daily satisfaction without inflating costs
- Audit return on each upgrade using cost-per-use and replacement intervals to guide budget planning decisions
- Target durable fixtures and efficient systems that lower operating expenses while preserving overall aesthetic
This approach keeps your renovation powerful, disciplined, and data-driven, ensuring you gain tangible value and confidence in every dollar spent.
Conclusion
Sure—here’s a tight, data-driven closer with a dash of irony:
So you’ve mapped every line item, staged the chaos, and budgeted for every inch—amazing, really. Because nothing screams efficiency like predicting every surprise a bathroom can throw at you, right? If you’ve planned contingencies, you’ll crush delays and extra charges—until you don’t. Still, you’ll sleep better knowing the waterproofing is solid, the fixtures are efficient, and the timeline isn’t a myth. Congratulations on mastering the art of sensible splurging.