Think of a timber-frame wall like a well-sealed membrane: a single draft can turn a warm room into a cold ledger. You’ll balance continuous insulation with precise junction detailing, manage moisture risks, and choose UK-compliant materials to keep performance reliable year after year. The path isn’t trivial—you’ll need rigorous installation sequencing and airtightness paired with effective ventilation. Get your approach right, and the system sustains energy efficiency, comfort, and durability, but it won’t happen without careful attention to every detail.
What Makes UK Timber-Frame Walls Unique for Insulation
UK timber-frame walls are structurally lightweight and rely on a vented cavity and continuous insulation strategy, which makes their thermal performance highly sensitive to junction details. You navigate the system by focusing on timber framing as the primary load path and enclosure backbone, not as a heat trap. Insulation materials must bridge irregularities at studs, joints, and openings, maintaining continuous coverage without creating thermal bridges. You evaluate performance by considering the cavity’s ventilation balance, moisture mitigation, and the airtightness strategy compatible with timber-frame construction. The selection of insulation materials matters for compressive strength, long-term stability, and compatibility with timber components to avoid gaps. Precision detailing at perimeters, penetrations, and corners governs overall resilience, long-term energy efficiency, and occupant comfort.
Assessing the Fabric: Spotting Gaps and Moisture Risks
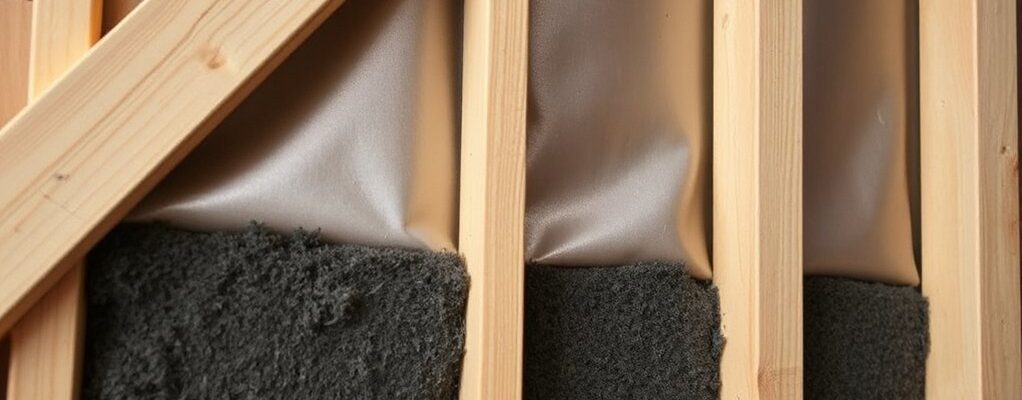
In timber-frame walls, spotting gaps and moisture risks begins with a disciplined audit of the fabric at all junctions—stud-to-sheathing, at openings, and where penetrations occur. You assess continuity of the air barrier, identify unwraps in joints, and log any irregularities in fastener zones. Focus on fabric integrity: compression at clips, torn WRB, and unsealed penetrations that can channel moisture inward. Evaluate timber joinery for microcracks, gaps, or misalignment that create condensate traps. Inspect paint adhesion as an indicator of substrate conditions and prior moisture exposure. Document seasonal moisture swings, and correlate with ventilation and wind-driven rain exposure. Your goal is a precise map of vulnerabilities, guiding targeted remedial measures before insulation strategies proceed.
Exterior Timber-Frame Insulation Options in the UK
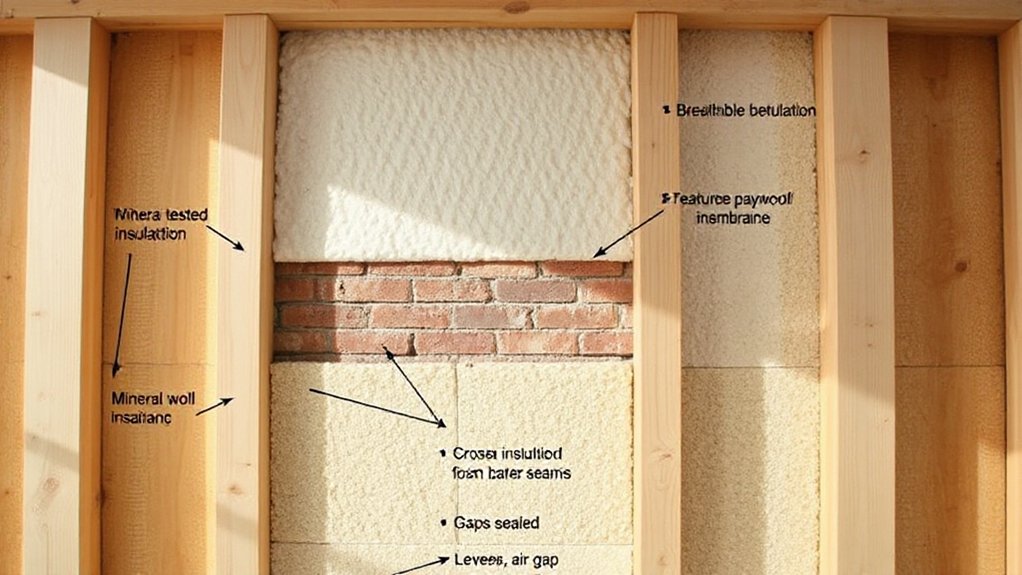
External insulation options frame your choice between brick-finishes and timber-frame assemblies, with each method affecting long-term airtightness and moisture risk. You’ll compare timber-frame U-value targets against installed assembly performance, guiding where to add cavity fills, rigid boards, or mineral wool while preserving thermal bridging control. Vapour barrier strategies must align with the chosen exterior system to manage moisture transport without compromising breathability or condensation risk.
External Insulation Options
Could you choose the most effective external insulation method for a timber-frame wall in the UK? External insulation options present a balance between performance, durability, and system compatibility. You should assess insulation material density, thermal resistance, and moisture management, then compare continuous external insulation versus ventilated cladding systems. Timber cladding offers aesthetic variety but must be designed to minimize thermal bridging at junctions with the timber frame, headers, and openings. Consider rigid insulation boards, mineral wool, or insulated render with appropriate fixing patterns, air gaps, and service routes. Guarantee detailing around penetrations and corner conversions reduces cold spots and wind-driven rain ingress. Durability, fire performance, and installation tolerance influence long-term performance; select a system compatible with existing framing, local climate, and maintenance expectations.
Timber Frame U-Value Targets
Given UK timber-frame assemblies, targets for U-value must reflect the balance between thermal performance, moisture control, and amenability to installation. U-value targets for timber-frame walls hinge on combined assembly performance, including sheathing, cladding, and interior finishes. You’ll compare standardized requirements, like SAP/Compliance paths, with project-specific conditions, such as climate zone and wind exposure. Achieving lower U-values demands thicker insulation or higher-performance boards, but you must consider moisture risk and timber joints, ensuring detailing accommodates drainage and drying. Prioritise continuous insulation continuity, junction detailing, and airtightness strategies to prevent thermal bridging. Insulation longevity depends on material compatibility, installation quality, and long-term performance; choose low-void interfaces and robust fixings. Documentation should quantify targets, tolerances, and inspection checkpoints for reliable, durable assemblies.
Vapour Barrier Strategies
What vapour-control strategy best suits exterior timber-frame insulation in the UK, and why does it matter for durability and performance? You evaluate options by balancing moisture risk, climate, and construction sequencing. Vapor retarders provide controlled permeability, reducing inward moisture migration while accommodating seasonal humidity fluctuations. In practice, you select a system aligned with the wall’s permeability class, ensuring the external rain screen and insulation layer remain dry to preserve timber integrity. Breathable membranes offer a complementary path for inwards drying without creating condensation traps, assuming proper detailing around joints, penetrations, and service routes. The strategy should integrate with air barriers, ensuring continuous continuity across assemblies. Prioritise robust detailing, manufacturer guidance, and UK climate data to minimise condensation risk, mould growth, and thermal degradation over the wall section’s service life.
Interior Insulation Strategies That Prevent Moisture Traps
Interior insulation can trap moisture if a wall’s inner layers don’t manage vapor diffusion and air movement effectively; therefore, strategies that promote controlled drying paths and clear vapor control are essential. You should profile wall assemblies to verify diffusion pathways align with adjacent materials, reducing condensation risk at interfaces. Use breathable insulation where appropriate, coupled with permeable sheathing and a continuous vapor retarder only where required by climate. Seal penetrations judiciously to avoid bypass channels while preserving drainage planes behind interior finishes. Implement gradual temperature gradients across studs to minimize dew-point formation, and maintain robust air filters to prevent dust-clogged pores that hinder moisture migration. Plan interior decor and furniture placement to avoid obstructing expected air movement, keeping pathways open for drying. This improves long-term performance and reduces mold potential.
Airtightness vs Ventilation: Balancing Energy Savings and Air Quality
Achieving airtightness can reduce energy losses, but without adequate ventilation, indoor air quality suffers. You balance this by controlling where and how air moves, minimizing thermal bridging while preserving fresh air supply. Airtight membranes reduce uncontrolled leakage, yet require deliberate ventilation design to maintain IAQ. When you design junctions and films, you must consider continuity, detailing, and material compatibility to avert condensation risk and draft paths. The goal is to lower heat loss without creating stagnation or pollutant buildup. Precision matters: quantify air changes per hour, test for leaks, and ensure mechanical or natural ventilation aligns with occupancy. The interplay of airtightness and ventilation shapes overall performance, especially at timber frame interfaces.
- You’ll feel the impact of tiny leaks on comfort and energy bills.
- Precision detailing reduces thermal bridging and drafts.
- Correct membrane placement minimizes moisture risk and noise ingress.
- Proper ventilation preserves air quality while saving energy.
Vapor Control and Moisture Management in Timber Frames
You’ll consider how vapor flow control, moisture buffering strategies, and integrated drainage and ventilation paths interact to protect timber frames. Assess the mechanisms that move moisture, store it temporarily, and vent it safely to prevent condensation and decay. This discussion sets the framework for selecting materials and detailing details that balance durability with performance.
Vapor Flow Control
Vapor flow control in timber frame walls governs how moisture moves through assemblies, shaping condensate risks and long-term durability. You assess pathing, driving forces, and material resistances to prevent moisture accumulation, differential drying, and rot. Precision matters: misjudged vapor permeance or location of barriers can create condensation pockets at cold bridges, elevating risk of thermal bridging and material degradation. You balance permeability, air barriers, and drainage to maintain stable hygrothermal conditions, reduce air leakage, and minimize stack effects across seasons. Effective control aligns with structure and detailing, ensuring that moisture can vent without compromising insulation performance. Thermal bridging and Air leakage are critical reference points as you design for predictable drying and durable integrity.
- Controls align with measured vapor permeance to avoid hidden damp
- Barrier placement minimizes unintended drying paths and cold spots
- Detailing reduces thermal bridges without sacrificing airflow balance
- Continuous evaluation keeps moisture pathways clear and predictable
Moisture Buffering Strategies
Effective moisture buffering in timber-frame walls relies on deliberate control of vapor flow and timely moisture storage. You assess vapor-control strategies as part of a holistic wall system, balancing permeability, sealing, and material sorption to limit peak interior humidity. You account for permeable sheathing and breathable insulation layers to decouple moisture transport from heat flow, reducing thermal bridging by design and maintaining consistent surface temperatures. You evaluate moisture buffering capacity of timber, cladding, and interlayers, ensuring storage capacity aligns with climate loads and occupancy patterns. You consider constraints on acoustic performance, acknowledging that vapor barriers can influence sound transmission if misapplied. You document measurable outcomes, verifying that moisture management does not compromise structural integrity, ventilation effectiveness, or long-term durability.
Drainage and Ventilation Paths
Drainage and ventilation paths in timber-frame walls are designed to manage moisture by guiding liquid water and water vapor away from the structure while permitting air movement that supports drying. You’ll guarantee controlled drainage behind cladding and through-drainage channels, minimizing capillary rise. Vapor control layers balance impermeability with drying capacity, preventing condensation within timber elements. Ventilation paths—perforated rainscreens, vents, and cavity gaps—permit continuous air exchange, reducing humidity buildup that harms interior finishes and timber aesthetics. Assemblies must tolerate seasonal fluctuations, maintaining a dry, stable core. Detailing focuses on continuity, compatibility, and durability, avoiding interstitial moisture retention. Proper sequencing from exterior to interior preserves finish integrity, supports accurate moisture gradients, and sustains long-term performance of timber aesthetics and interior finishes.
- Clear drainage routes reduce moisture risk
- Strategic venting preserves interior finish quality
- Continuous detailing minimizes condensation
- Material compatibility sustains timber aesthetics
Moisture-Safe Detailing Around Openings: Windows, Doors and Penetrations
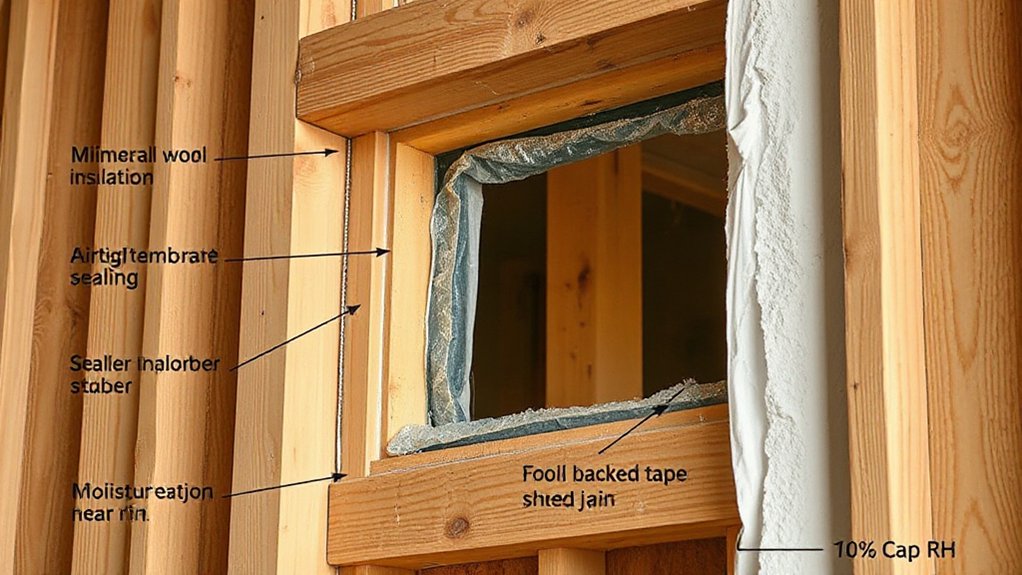
When detailing moisture-safe interfaces around openings, you must account for potential water ingress paths and the interaction with the wall assembly to prevent capillary rise, condensation, and timber decay. You assess expansion joints, flashing, and sill detailing to maintain continuous drainage and damp-proofing at window and door openings. Sealants and tapes must tolerate movement without compromising vapour control, while precincted flashing deflects water away from timber studs. Install controlled drainage planes behind soffits and lintels to limit moisture buildup around penetrations, and assure ventilation channels remain clear. Decorative finishes are considered after primary moisture barriers are secured, so finishes don’t bridge drainage paths. Structural reinforcement is retained through properly anchored frames, preventing deformation that could create gaps.
Choosing Compliant Materials and UK Standards You Need
You must guarantee that the materials you choose comply with current UK standards and effective performance criteria. This means verifying manufacturer declarations, test evidence, and conformity routes to align with both building regulations and sector schemes. Start by mapping material compliance essentials to your project scope, then confirm UK standards alignment for each component to avoid gaps in performance and documentation.
Material Compliance Essentials
What compliance standards govern material choices for UK timber frame walls, and how do they shape your selections? You assess performance, durability, and safety baselines set by UK regulations, testing regimes, and warranty criteria, then map them to your project goals. Historical context informs material lineage, while aesthetic considerations influence finish compatibility and installation tolerances. You compare insulation boards, sheathing, and fasteners for declared fire ratings, moisture resistance, and long-term stability, ensuring traceability and responsible sourcing. You prioritize risk assessment, lifecycle impact, and documentation to support approvals. Conformity underpins cost planning, performance guarantees, and ongoing maintenance, so your choices must be auditable and reproducible.
- Confidence from proven, standards-aligned performance
- Reassurance through documented fire, moisture, and sustainability metrics
- Clarity on traceability, sourcing, and supplier warranties
- Focused balance of historical context with modern efficiency
UK Standards Alignment
UK standards alignment for timber frame walls centers on selecting materials that meet regulatory performance, safety, and sustainability benchmarks. You evaluate products against UK Building Regulations, British Standards, and BRE guidance, ensuring compatibility with existing wall assemblies. Focus on durability, fire resistance, and moisture management to reduce long-term failure risk. You’ll verify third-party certifications, performance declarations, and traceability to support compliant installation. Timber preservation considerations guide preservative-treated components that resist decay without compromising acoustic or thermal performance. For walls, you assess insulation materials for declared thermal conductivity, vapor permeability, and sustained consistency under varying UK climate conditions. Acoustic insulation requirements inform test data and installation details to achieve target sound reduction. Always document material provenance, warranty terms, and maintenance expectations to sustain compliant performance throughout the building lifecycle.
A Practical Step-by-Step Installation Workflow
Initiate the workflow by outlining the sequence of tasks from wall preparation to final sealing, ensuring each step aligns with the project’s performance targets. You proceed methodically: inspect timber frame integrity, install continuous insulation, fit vapor control layers, apply air barrier, and seal joints with acoustic/thermal seals. You then mount interior linings, align panels, and check for plumb and level before fastening. Install interior decor elements and cable routes, verify detailing for paint finishes, and perform moisture and thermal bridgings checks. Finally, perform sealing, edge detailing, and surface protection to meet performance targets and long-term durability.
- You gain confidence as each step locks into place, reducing risk of future remediation.
- You feel clarity from precise sequencing that minimizes waste.
- You sense control through rigorous inspection checkpoints.
- You anticipate a cleaner, faster interior decor and paint finishes integration.
Troubleshooting Pitfalls and Maintenance Tips
As you move from installing continuous insulation and air barriers toward ongoing performance checks, anticipate common pitfalls that can undermine envelope integrity. You’ll identify finishing gaps, seam misalignment, and unsealed penetrations that compromise airtightness and moisture control. Prioritize consistent detailing at junctions to prevent thermal bridging where studs contact outer layers; small omissions amplify heat loss and condensation risk. Regularly monitor for air leakage paths using smoke tests or blower door diagnostics, then seal with appropriate tapes, foams, or gaskets matched to substrate and climate. Track interior aesthetics alongside performance: disturbed finishes can signal moisture ingress or framing movement. Schedule seasonal inspections of cladding interfaces, flashing, and insulation edges. Document maintenance actions, replacement schedules, and evolving product advisories to sustain long-term envelope integrity and occupant comfort.
Frequently Asked Questions
How Is UK Timber-Frame Insulation Different From Others?
UK timber-frame insulation differs by prioritizing minimised thermal bridging and careful vapor barrier placement; you target continuous insulation, robust air tightness, and moisture control, ensuring detailing around studs, sheathing, and junctions reduces heat loss and condensation.
Can Retrofits Prevent Moisture Without High Costs?
Yes, retrofits can manage moisture without prohibitive costs if you install moisture barriers at key junctions and interior vapor controls, while selecting cost-effective retrofit costs and durable, breathable membranes to optimize drainage and minimize condensation risks.
Which Insulation Materials Meet UK Building Standards?
Thermal resistance meets UK building standards with mineral wool, phenolic foam, PIR, and EPS insulation. You’ll assess thermal resistance and environmental impact, selecting materials that balance U-values, fire safety, and embodied carbon for compliant performance.
Do Interior and Exterior Layers Interact in Moisture Risk?
Yes, interior-exterior interaction affects moisture risk; you must monitor moisture dynamics across layers. You’ll consider vapor diffusion, drainage paths, and dew point shifts, ensuring airtightness while permitting controlled drying to minimize condensation and material degradation.
How Long Does a Typical Timber-Frame Retrofit Take?
Timber-frame retrofit typically takes weeks to months, depending on scope. You’ll assess timber-frame durability, coordinate materials, and sequence tasks. You plan meticulously, monitor moisture, and document progress for retrofit planning, timing, and long-term structural performance.
Conclusion
You’ll see insulation in the UK timber frame like a well-choreographed heist: everyone pretends nothing leaks, until a damp patch spills the plot. Exterior and interior layers play cat-and-mouse with moisture, while airtightness wields a “trust me, I’ve sealed it” badge. In truth, junction detailing is the slick getaway car, vents the getaway driver, and compliant materials the safe. Do it right, monitor, maintain, and you won’t just save energy—you’ll foil condensation’s grand finale.