Cavity wall insulation can cut heat loss and boost comfort, but you’ll want a clear UK retrofit plan. Start by confirming wall type and cavity presence, then choose a suitable material and a certified installer. Consider costs, payback, and regulatory checks before you proceed. Make certain ventilation, moisture controls, and post-installation maintenance are baked in. Ready to assess eligibility and outline your best path forward, you’ll want specifics on gaps, seals, and moisture barriers before you commit.
Am I Eligible? Wall Types, Damp Risk, and Regulatory Checks
If you’re wondering whether you can insulate your cavity walls, start by checking wall type, damp risk, and regulatory rules. You’ll assess eligibility by confirming you have cavity walls, not solid masonry. Damp risk matters: high damp locations or historic damp issues can limit or complicate insulation. Regulatory checks look for compliance with building regulations, safety standards, and any local guidance. Thermal bridging should be considered, since gaps at joints can transfer heat; verify details address potential bridges. Insulation thickness must meet manufacturer specifications and local rules, avoiding excessive bulk that could crowd air vents or windows. Also verify any grants, warranties, or installer accreditation required for your property. If any doubt remains, consult a qualified inspector before proceeding.
Identify Your Wall Type: Cavity Suitability for UK Homes
To determine if your UK home has cavity walls suitable for insulation, start by confirming the wall type.
- Check exterior bricks and inner leaf: identical thickness suggests a standard cavity.
- Look for a visible gap or brick bond changes that indicate a cavity is present.
- Measure wall thickness or ask a building professional to verify insulation compatibility.
- Review construction records or survey notes for cavity details.
Wall thickness and insulation compatibility drive suitability decisions; not all homes with gaps are eligible. If you’re unsure, run a quick pass with a professional survey to confirm cavity presence, thickness range, and any structural concerns. Remember, rouge pockets or filled cavities can negate insulation benefits and require alternative retrofit options. Prioritize accurate identification to avoid wasted effort.
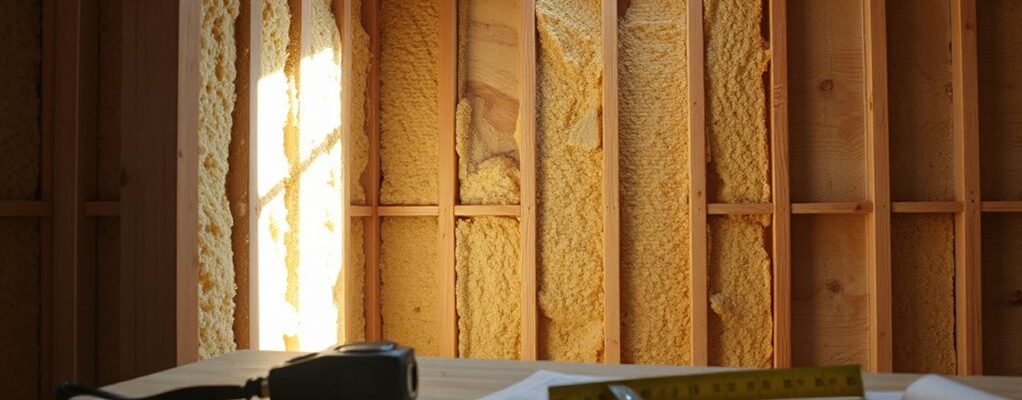
Choose the Right Insulation Material for Your Walls
Which insulation material fits your cavity walls best depends on performance, cost, and install practicality. You should assess wall compatibility with common methods: dense polyurethane foam, mineral wool, and expanded polystyrene. Each material offers different thermal performance, moisture handling, and air tightness. For exterior retrofits, consider wind resistance and profile; for interior cavities, assure vapor control and movement tolerance. Insulation materials vary in ease of installation, coating requirements, and potential risks to existing plaster or brickwork. Choose a solution that preserves structural breathability where needed and minimizes cold bridges. Prioritize materials that meet mechanical compatibility with your wall system and long-term durability. Verify supplier data on fire safety, acoustic benefits, and suitability for your specific wall type.
Costs, Savings, and Payback Timelines
Costs, savings, and payback timelines vary with material choice, retrofit scope, and energy prices. You’ll see upfront costs, ongoing energy savings, and a defined payback period that depends on insulation quality, home airtightness, and usage patterns. In practice, expect gradual reductions in heat loss and steadier indoor comfort as the wall system performs. Track your monthly bills to verify energy savings against your investment. The payback period shortens with lower installation costs, higher energy prices, and longer stays in the home. Consider maintenance needs and potential heat recovery options to extend benefits over time. Evaluate scenarios to balance comfort, cost, and payback timelines with your long‑term plans.
- Material cost and installation scope influence payback
- Energy prices and usage determine energy savings
- Payback period varies by climate and occupancy
- Rebate or incentive availability can shorten payback
Permissions, Building Regs, and Certified Installers
Before you start, check that you’m compliant with local permissions and building regulations, and hire a certified installer. Your checklist begins with Permitting requirements—confirm your project needs any formal consent from planning or building control, especially in conservation areas or listed buildings. Next, verify compliance with Building Regulations Part L for insulation performance and Part F for ventilation implications; you’ll need appropriate documentation and, if required, an approved inspector’s sign-off. Choose an installer certification from a recognized body, ensuring they’re trained in cavity wall systems and health and safety. Request up-to-date guarantees, method statements, and risk assessments. Maintain records of permits and certification for future inspections or resale. Confirm access, waste handling, and debris removal plans before work starts.
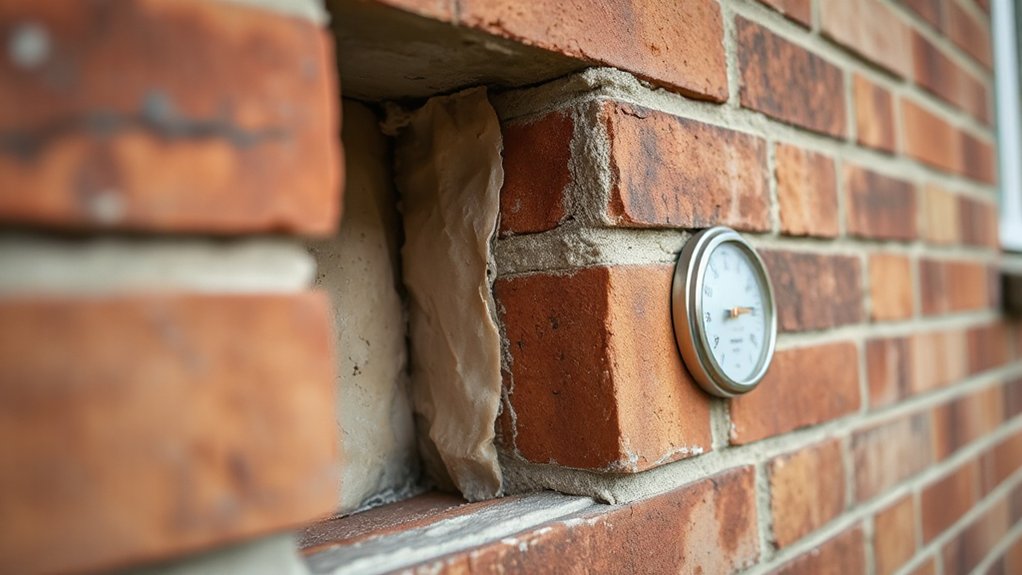
Ventilation and Moisture Management During and After Installation
Ventilation and moisture management are essential during and after cavity wall insulation to prevent condensation and mold. You’ll protect performance by balancing airflow and installing moisture barriers where needed, guaranteeing any changes don’t trap damp air inside.
- Guarantee adequate ventilation during and after installation to maintain an airflow balance.
- Use moisture barriers in exterior reveals and around potential damp spots to control migration.
- Seal air leaks carefully to avoid creating hidden moisture accumulation.
- Monitor humidity levels and adjust ventilation or dehumidification as needed.
This approach helps prevent cold spots and damp risk, supports insulation effectiveness, and minimizes future remediation. In practice, recheck seals after any retrofit work, and document ventilation and moisture controls for ongoing maintenance.
Preparation, Installation Day Expectations, and Aftercare

Preparation for install day sets expectations, outlines what happens on the day, and highlights post-install care and maintenance. You’ll follow step-by-step instructions, have key access and safety checks completed, and confirm any weather or access windows. Afterward, you’ll know how to monitor for changes, keep the area clear, and schedule follow-ups if needed.
Preparation For Install Day
To prepare for install day, start by clearing the work area and securing pets and kids in another room; this keeps installers safe and speeds up the process. You’ll want to align expectations, confirm access, and verify any key measurements before crews arrive. Have a clear plan for dust control and temporary storage of belongings. DIY tips help you stay informed, while contractor selection ensures trained technicians handle the job. On installation day, expect some disruption but know the team will minimize noise and strain. Aftercare guidance will follow, including insulation checks and minor touch-ups. Keep a contact person ready for questions, and document any concerns for warranty purposes.
- Clear the workspace and secure householders
- Confirm access, timing, and measurements with the contractor
- Ensure pet and kid safety plans are in place
- Review aftercare instructions and warranty details
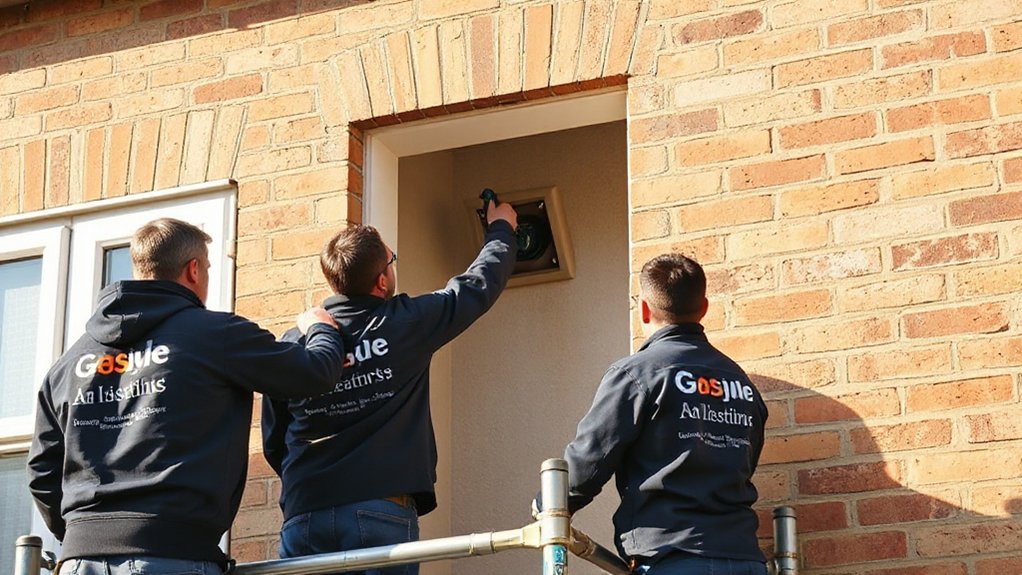
Day Of Installation Steps
On installation day, expect a focused, orderly process as the crew arrives, confirms access, and reviews the agreed scope and measurements. You’ll see a brief site briefing, then quick setup: containment, dust control, and safety checks before work begins. Technicians verify wall details, seal any gaps, and prepare surfaces to minimize disruption. Equipment is moved in efficiently, and progress is tracked against the plan, keeping you informed. Work proceeds methodically to reduce thermal bridging, with careful insulation placement to meet target U-values. Acoustic benefits are considered in junctions and shared walls, so panels fit snugly without gaps. If interruptions occur, crews pause only to verify measurements and re-establish seal integrity. Upon completion, expect a clean workspace and documented settings for future reference.
Aftercare And Maintenance
Aftercare starts as installation wraps up. You’ll want clear, practical steps to protect your investment and guarantee insulation longevity. In the first days, check external walls for leaks or damp spots and report any concerns. Maintain ventilations as advised to balance moisture control without cold drafts. Keep areas around newly insulated walls undisturbed to prevent shifting or gaps. Monitor for unusual noises, drafts, or decreases in performance, and contact the installer if issues arise. Regular checks every few months help catch problems early. Adhere to warranty guidance and service intervals for top performance. Insulation longevity hinges on proper care and timely repairs.
- Inspect for damp or leaks and address promptly
- Maintain ventilation to balance moisture control
- Avoid heavy storage or drilling near insulated areas
- Schedule follow-up assessments per manufacturer guidance
Frequently Asked Questions
How Long Does Installation Typically Take per Wall?
Installation timeline varies, but you should expect roughly a full day per wall, with wall preparation and access setup taking the first half and actual insulation work the second. You’ll need to allow for drying/settling after completion.
Can Cavity Wall Insulation Cause Indoor Temperature Fluctuations?
Yes, it can cause indoor temperature fluctuations temporarily as the insulation settles; monitor for improved thermal comfort over time. Guarantee proper installation to maximize insulation effectiveness, minimize drafts, and maintain consistent temperatures with controlled air leakage and ventilation.
Will Insulation Affect Hoa or Leasehold Restrictions?
Insulation itself won’t override HOA restrictions or leasehold rules. You should check your HOA covenants and lease terms first, then consult the management or building supervisor. If allowed, document approvals and compliance with HOA restrictions and Leasehold rules.
Are There Any Post-Installation Odor or Dust Concerns?
Yes, you may notice temporary odor and dust concerns after installation, but they’re usually minimal. You’ll want to ventilate, seal off work areas, and follow cleanup guidelines to minimize Odor concerns and Dust concerns.
What Maintenance Is Required After Installation?
Soon after installation, you should visually inspect for moisture intrusion and confirm vents stay clear. On average, 1 in 5 homes report occasional damp if not maintained. Practice moisture management and check insulation durability annually.
Conclusion
You’ve checked wall types, chosen the right insulation, and confirmed installers meet standards. With proper ventilation, moisture management, and post-installation monitoring, your retrofit should perform reliably and help curb heat loss. Don’t skip damp checks or gaps in sealant, and keep up with regular inspections to sustain energy savings. Stay proactive—think of it as laying a solid foundation for comfort and value, a smart move that pays back over time.