
Start by inspecting for loose or rotten boards, loose fasteners, and water damage, then secure, replace, and dry the surface before any cleaning. Clear debris, dry the deck completely, and address safety. Clean thoroughly, remove standing water, and use a stiff brush with an appropriate cleaner. Lightly sand, then apply a penetrating sealer to preserve color and moisture resistance, followed by a non-slip top coat. With proper steps, you’ll protect and extend the deck’s life—more tips await.
Assess Deck Damage: What to Look For and Prioritize
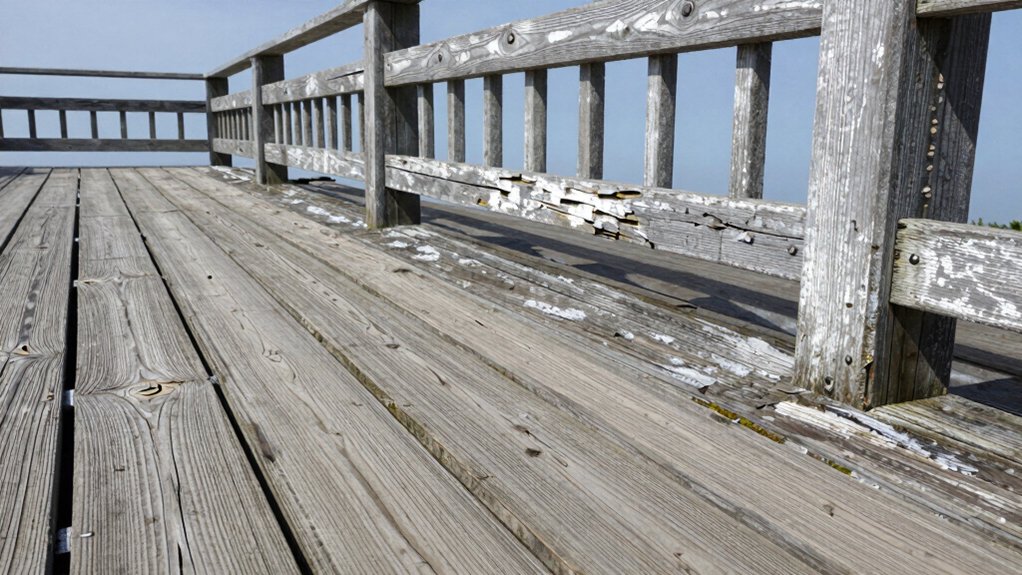
Start by inspecting for structural damage that could compromise safety: look for rotten or soft deck boards, loose or rusted fasteners, and any sagging joists or supports. You notice where wear is concentrated—edges near stairs, corners under heavy use, and areas exposed to sun or rain.
Prioritize securing fasteners and replacing compromised boards before cosmetic work. Assess for water damage, mold, and term‑driven rot that can undermine stability.
When evaluating stain and surface, distinguish between surface weathering and structural failure. Plan deck stain removal only after you’ve stabilized the frame and cleared loose debris.
Document findings with notes and photos to guide weatherproofing techniques and future upkeep. Your goal is a safer, more inviting space where you belong—confident, prepared, and proactive.
Choose Materials for Deck Restoration: Durability, Cost, Climate
Choosing materials for deck restoration hinges on durability, cost, and climate. You’ll shape a deck that lasts by weighing wood selection and composite options against environmental demands, maintenance, and budget.
Consider these essentials:
- Durability first — select rot-resistant woods or proven composites that resist moisture and UV exposure.
- Cost balance — upfront price vs. long-term upkeep, finding value in longevity and minimal refinishing.
- Climate compatibility — for humid regions, prioritize moisture tolerance; in sun-drenched areas, favor UV-stable finishes and color retention.
Prepare for Restoration: Cleaning, Drying, and Safety
Before you start, clean and dry the deck thoroughly, removing debris and loose boards to expose the surface. Prioritize safety first by checking for nails, splinters, and mold, and wear proper PPE before any scrubbing or drying.
Then prep for restoration by framing a clear plan: inspect for damage, choose appropriate cleaners, and set up drying and ventilation to prevent new issues.
Cleaning And Drying
To clean and dry a weather-beaten deck effectively, start by removing loose debris, then scrub the surface with a stiff brush and a cleaner appropriate to the deck material. You’ll refresh its look and set the stage for lasting performance.
- Remove standing water and dry surfaces thoroughly after cleaning.
- Choose a cleaner that preserves wood tones or enhances composite aesthetics.
- Rinse completely, then allow the deck to dry fully to boost weather resistance.
This approach keeps your deck looking inviting and sturdy. By focusing on thorough cleaning and complete drying, you improve deck aesthetics and fortify weather resistance, helping your space feel like home.
You’ll feel confident inviting neighbors over, knowing your deck’s care is on solid ground.
Safety Precautions First
Safety comes first, so start with a clear plan and the right gear before you lift a tool. You’ll assess risks, wear eye and ear protection, and choose gloves and non-slip footwear. Clear the work area, remove obstacles, and understand your deck’s substrate and fasteners.
Ventilate, if indoors or enclosed, and test any cleaners on a small, inconspicuous spot. Read labels and follow manufacturer instructions to prevent skin irritation or fumes buildup. Stay mindful of weather conditions and keep a dry, organized workspace to avoid slips.
Use breathables and proper seals after cleaning to protect deck aesthetics and weather resistance. Establish a communication plan with helpers, and pause if rain or wind endangers you or the surface.
Safety done, you protect your investment.
Prep For Restoration
Getting your deck ready starts with a clear plan for cleaning, drying, and safety. You’ll set the foundation for a lasting finish by targeting prep steps that prevent failures and invite confidence in the process. Follow these essentials:
- Clean thoroughly: remove dirt, mold, and debris with a stiff brush and deck cleaner.
- Dry completely: wait for boards to dry before coating; use fans or sun exposure to speed up the process.
- Secure safety: wear gloves, eyewear, and a mask; protect nearby plants and surfaces.
This prep supports successful deck staining and wood treatment, ensuring even penetration and lasting color.
With belonging in mind, commit to precise execution now, so your project earns pride, durability, and a welcoming, refreshed look.
Step-by-Step Restoration: Drying, Sanding, Sealing, and Protection
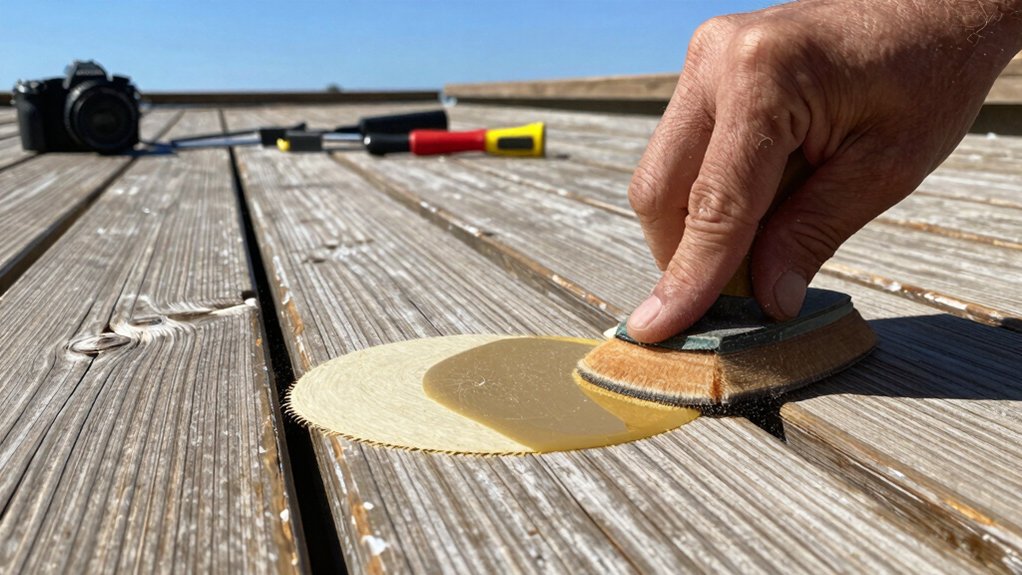
After the deck has dried to a stable moisture level, begin with a thorough evaluation to determine where sanding and sealing are most needed and to identify any repairs. You’ll map high-traffic boards, exposed edges, and knot areas where weather effects are most evident, then prioritize those spots.
Start with light sanding to open the wood grain, watching for raised fibers and splinters. Use a consistent grip and steady strokes, moving with the grain to preserve wood integrity and avoid uneven patches.
Clean thoroughly to remove dust, then apply a penetrating sealer that enhances color and repels moisture. Sealers should penetrate, not film over, preserving wood grain while protecting against UV and moisture.
Finish with a light coat of protective, non-slip finish to maintain safe, inviting deck experiences.
Maintain a Healthy Deck: Routine Care and Inspections
Regular inspections catch problems before they spread, so start with a Routine Inspection Checklist and address moisture, rot, and fastener integrity promptly.
I’ll guide you through preventive maintenance tips that keep your deck resilient, from tightening loose boards to resealing at recommended intervals.
Stay disciplined with a simple schedule and you’ll extend life, reduce repairs, and keep safety top of mind.
Routine Inspection Checklist
A routine inspection keeps your deck safe and durable, so start with a quick visual walk to spot obvious issues like loose boards, protruding nails, and warped planks. You’ll build confidence by confirming components are sound before you plan upgrades, and you’ll feel a sense of belonging in a shared space you can trust.
- Record condition, noting fasteners, joists, and railing stability to guide timely repairs.
- Test drainage and surface slope, addressing puddles that accelerate wear and compromise deck design.
- Prioritize weatherproofing techniques for the upcoming season, ensuring protective coatings and seals align with your project goals.
Keep notes accessible, so decisions stay clear and collaborative, shaping a durable, welcoming outdoor area.
Preventive Maintenance Tips
Preventive maintenance starts with discipline: establish a simple, repeatable routine that keeps your deck healthy year-round. You’ll gain confidence by scheduling regular checks, cleaning, and timely treatments as part of your home’s shared spaces.
Inspect for loose boards, protruding nails, and rail stability after weather swings, addressing issues before they escalate. Clean surfaces with a mild solution, then sweep and dry thoroughly to prevent mold.
Reapply finish on a predictable cycle, choosing seasonal staining that suits your climate and usage, so wear stays even and your deck feels cohesive.
Manage deck furniture placement to prevent scuffing and moisture traps, rotating pieces to avoid concentrated wear.
Document maintenance dates to foster accountability, belonging, and pride in a well-kept outdoor retreat.
Troubleshoot Common Pitfalls: Over-Sanding, Stains, and Poor Sealing
Over-sanding, stains, and poor sealing are the three most common deck-restoration pitfalls, and they tend to cascade into lasting problems if you don’t catch them early. You’ll regain confidence by spotting issues before they derail progress.
- Inspect for incorrect staining and uneven sanding, then adjust technique to ensure even color and smooth surfaces.
- Test sealant compatibility with the deck wood and weather exposure to prevent peeling or failure.
- Establish a disciplined workflow: clean, sand evenly, stain uniformly, seal promptly.
Avoid over-sanding, which dulls grain and invites splinters. Address uneven sanding and incorrect staining now to protect fade resistance and provide a lasting, cohesive finish.
When you correct these missteps, you’ll feel the ownership and belonging that comes with a durable, well-kept deck.
Frequently Asked Questions
How Long Does a Complete Deck Restoration Typically Take From Start to Finish?
A complete deck restoration typically takes about 2–5 days, depending on size and condition. You’ll plan the project, perform prep, stain or seal with weatherproofing techniques, and maintain through regular deck maintenance to keep it lasting.
Can I Restore a Composite Deck With the Same Process as Wood?
Yes, but with caveats. You’ll need different steps for composite maintenance than wood, since composites resist staining yet differ in cleaning needs; expect a slower, gentler approach. deck material comparison shows tailored plan beats generic methods.
What Are the Signs That a Deck Joist Needs Replacement?
You notice sagging, cracking beams, and wobble in the railing—those signs tell you a joist needs replacement for deck stability, especially if you see pest damage or rot. Replace promptly to preserve safety and communal trust.
Is Specialized Protective Gear Required Beyond Basic Safety Gear?
When you’re chopping through rain-slick boards, you’ll wear protective gloves and weather resistant clothing, and you’ll still want extra gear only if you’re cutting, grinding, or handling splinters—otherwise basic safety gear suffices for most tasks.
How Often Should I Recoat or Reseal After Restoration?
You should recoat every 1 to 3 years, depending on wear. After restoration, monitor for fading and peeling, and perform annual inspections. Use deck cleaning before reapplication and choose stain selection that matches your climate and lifestyle.